!!! CAUTION !!! Please do NOT run python command directly in the SSH terminal!
By doing so, you are running a potentionally intensive computing task on OSCER login machines. Intensive computing tasks had a tendency to crash the login machines, thus preventing all other 1000+ OSCER users from logging in! Please make sure to read the Python Basic Setup instruction to understand how to properly set up a Python environment and submit a Python batch job on the supercomputer.
If you have trouble following the instruction below, feel free to join OSCER weekly zoom help sessions.
Running Python with VS Code on OSCER
This instruction assumes you have read and followed the Running VS Code on OSCER instruction thoroughly, from the first step to the last step. In this instruction, you will gain more insights regarding how to set up your python environment for VS Code on the supercomputer, as well as how to improve your productivity by utilizng VS Codes' most powerful tools: interactive Jupyter notebook and intellisense code-autocompletion. Depending on whether you set up your python environment from a "vanilla" virtual environment or from conda, we strongly recommend reading our Python Basic Setup instruction and/or Mamba/Conda instruction, especially the environment setup steps, so that you are familiar with some common terminal commands to set up and activate a python environment. In this instruction, we cover the following steps:
1. Setting Up a Python Environment for VS Code
Please make sure you perform step 1 - step 4 of the Running VS Code on OSCER instruction. After you logged in to schooner (step 4), depending on your python environment:
- If you use conda
baseenvironment OR set up a "vanilla" python virtual enviroment, you're all set. - If you set up a customized conda environment, such as
picrust2, as mentioned in our Mamba/Conda instruction, please make sure you modify your terminal configuration file to activate your conda virtual environment, then LOG OUT and LOG IN. For example, if you want to activatepicrust2mamba environment, add the following line to the END of your terminal configuration file (~/.bashrcfor bash shell, or~/.zshrcfor zsh shell, or~/.cshrcfor csh shell, or~/.tcshrcfor tcsh shell - you get the idea):
mamba activate picrust2
Then log out and log back in.
2. Activating a Python Environment in a VS Code Batch Script
Please make sure you perform step 5 of the Running VS Code on OSCER instruction. At step 6, depending on your python environment:
- If you use conda/miniconda/mamba, please make sure you modify your terminal configuration file to activate your conda virtual environment, then LOG OUT and LOG IN again BEFORE submitting the following example batch script below. For example, if you want to activate
picrust2mamba environment, add the following line to the END of your terminal configuration file (~/.bashrcfor bash shell, or~/.zshrcfor zsh shell, or~/.cshrcfor csh shell, or~/.tcshrcfor tcsh shell - you get the idea):
mamba activate picrust2
Then log out and log back in.
This script will execute a VS Code server job on partitionvscode, requesting 1 CPU, 1GB memory, and 1 hour of run time:
 #!/bin/bash

 #

 #SBATCH --partition=vscode

 #SBATCH --output=vscode_%J_stdout.txt

 #SBATCH --error=vscode_%J_stderr.txt

 #SBATCH --chdir=/home/yourusername

 #SBATCH --ntasks=1

 #SBATCH --mem=1G

 #SBATCH --time=01:00:00


 rm -rf ~/.vscode

 export TUNNELNAME=$USER-$(hostname -s)

 echo Tunnel Name: $TUNNELNAME

 $HOME/code tunnel --accept-server-license-terms --name=$TUNNELNAME
(modifyyourusernameas your OSCER username)
- If you use a "vanilla" python virtual environment WITHOUT conda/miniconda/mamba, follow the example batch script below. This script will load
Python/3.10.8-GCCcore-12.2.0and activatetest_envenvironment, then execute a VS Code server job on partitionvscode, requesting 1 CPU, 1GB memory, and 1 hour of run time:
 #!/bin/bash

 #

 #SBATCH --partition=vscode

 #SBATCH --output=vscode_%J_stdout.txt

 #SBATCH --error=vscode_%J_stderr.txt

 #SBATCH --chdir=/home/yourusername

 #SBATCH --ntasks=1

 #SBATCH --mem=1G

 #SBATCH --time=01:00:00


 module load Python/3.10.8-GCCcore-12.2.0

 source ~/test/test_env/bin/activate

 rm -rf ~/.vscode

 export TUNNELNAME=$USER-$(hostname -s)

 echo Tunnel Name: $TUNNELNAME

 $HOME/code tunnel --accept-server-license-terms --name=$TUNNELNAME
(modifyyourusernameas your OSCER username)
Then save the batch script to a file, e.g.vscode.sbatch, and run step 7 - step 10 of the Running VS Code on OSCER instruction.
3. Running a Python Jupyter Notebook Interactively in VS Code
This step is an extension of step 11 in the Run VS Code on OSCER instruction, where you start using VS Code after connecting to the VS Code Tunnel created by the VS Code Server batch job. Here, we show you how you can use VS Code to run a python Jupyter notebook file (.ipynb) interactively on your local laptop/PC, using the supercomputer as the backend computing engine.
First, make sure to follow step 11 in the Run VS Code on OSCER instruction to open a directory that you want your python notebooks to reside. For example, I'm browsing my test_python directory under my home directory.


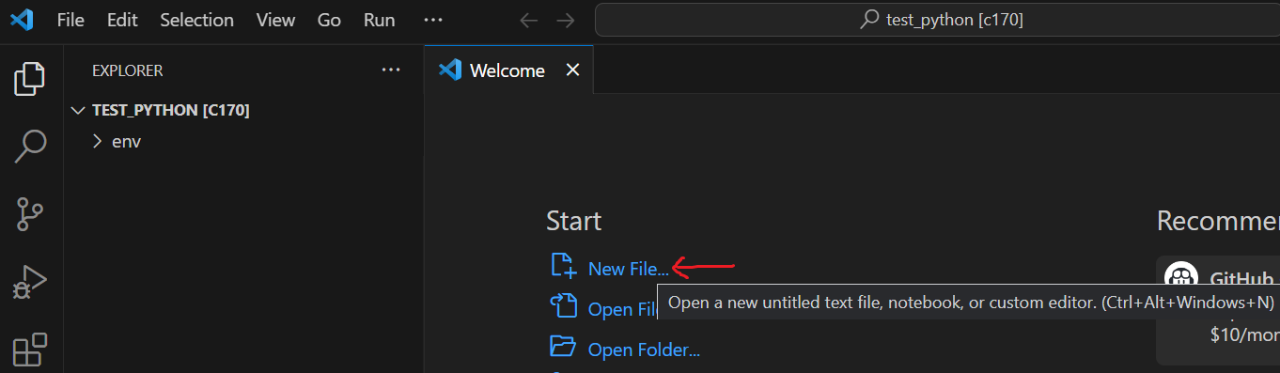
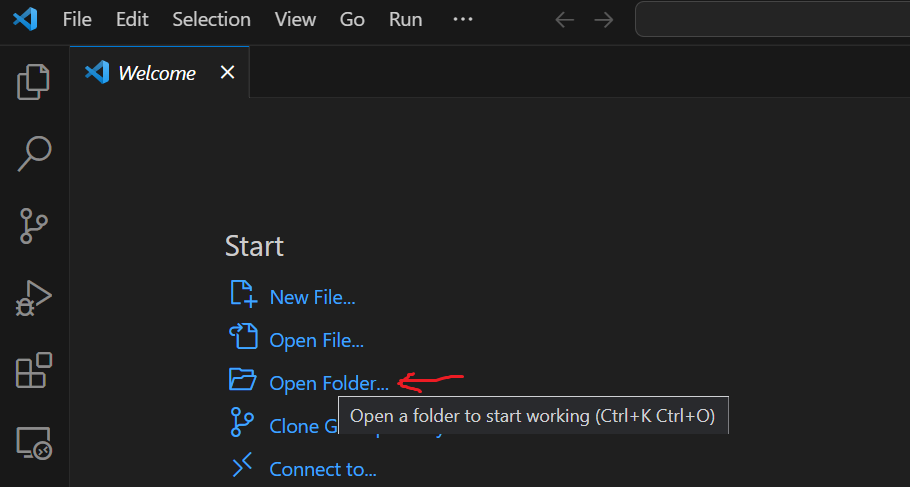
If you have an existing .ipynb python notebook in your working directory, it should appear on the directory tree on the left panel of VS Code. Here, I'm showing how to create a new notebook, by clicking on New File option and select Jupyter Notebook.

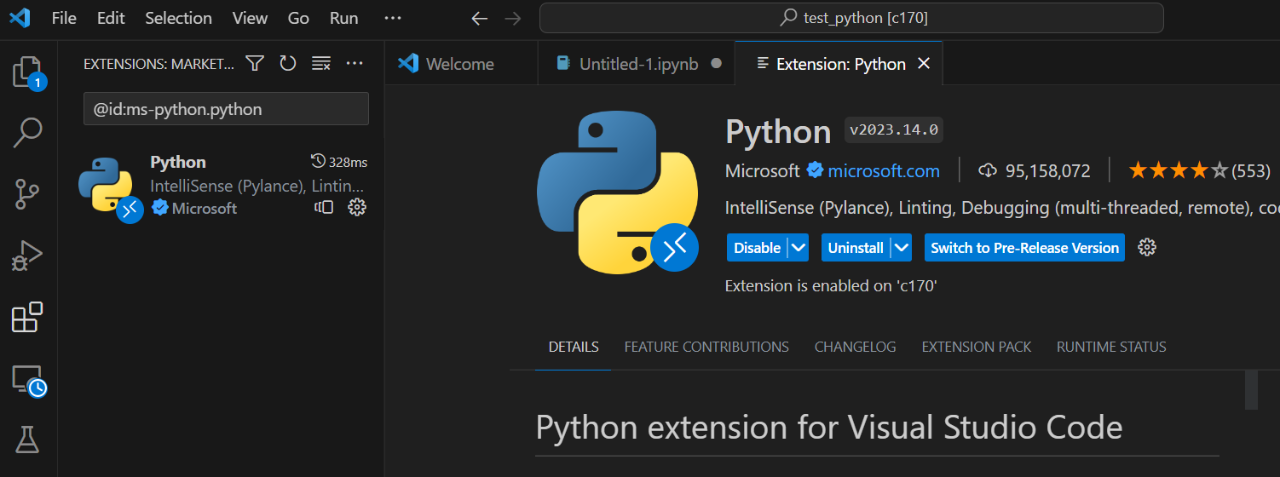
The first time you open a python Jupyter notebook, VS Code is smart enough to ask you to install "recommended" Python extension. Hint: it's REQUIRED. Click the Install button to install Python extension on the VS Code Server.

If somehow that suggestion does not pop up, you can always go to the extension tab and search python to install the REQUIRED Python extension.
Below is what a new blank python Jupyter notebook looks like in VS Code, with the first code cell automatically added. You can also notice that Dark Mode is enabled by default in VS Code.

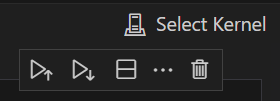
The next step is to select a "kernel" (think of it as a python environment for Jupyter notebook).
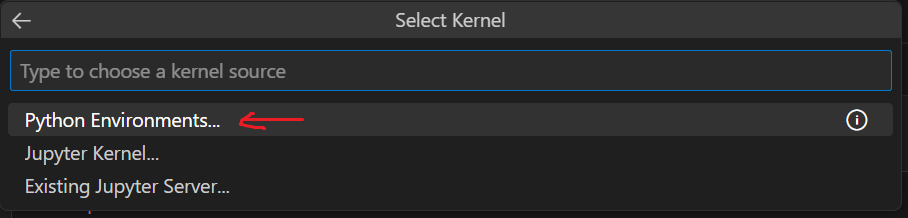
The first time you click the Select Kernel button, you probably don't see any other option rather than Browse marketplace for kernel extensions. This is because you have not installed the Jupyter extension in VS Code. This is, again, REQUIRED. Click on the Install button under Jupyter extension to install it.


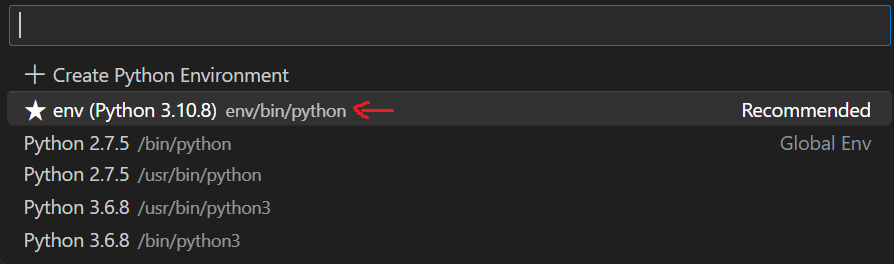
After you installed the Jupyter extension, when you click Select Kernel button, you should see two extra choices: Python Environments and Jupyter Kernel. Choose Python Environments and select the default (★) environment. This should be your python virtual environment or conda environment that you activated in your VS Code Server batch script.
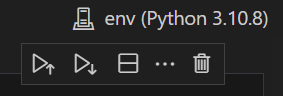
The Select Kernel button now show your python environment name and version.
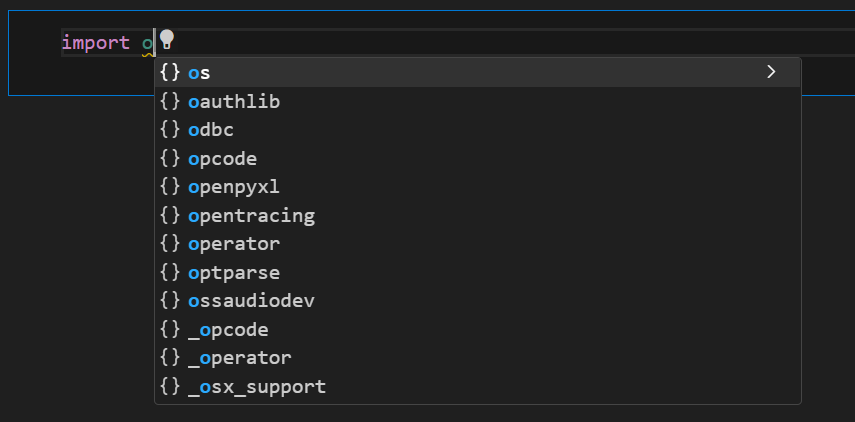
You can start writing your python code now in a code cell of your python Jupyter notebook. VS Code Jupyter extension has built-in intellisense code autocompletion feature. When you type your code and wait for 1-2 seconds, a dropdown menu selection would appear, showing possible choices for your code completion, as well as function docstrings (i.e. brief descriptions of functions and their arguments. Hopefully this should be more intuitive than having to keep hitting the Tab or Shift+Tab button for a dropdown menu or docstring in Jupyter Lab / Notebook.
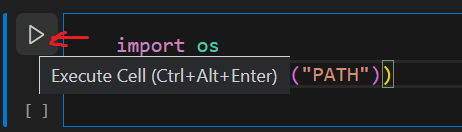
Below is my simple python code to get and display the PATH environment variable.

To run the python code in a code cell, click on the Play (▶) button to the left of the code cell you want to execute.
The first time you attempt to run a code cell in your python Jupyter notebook, again, VS Code will be smart enough to suggest you installing the ipykernel package. And, as you already figured out, it's REQUIRED. So please make sure to install it.
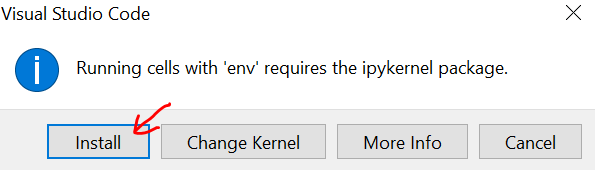
Once you installed the ipykernel package, your code cell will be automatically executed.

To create a new code cell, click on the +Code button at the top left corner of your python jupyter notebook tab.

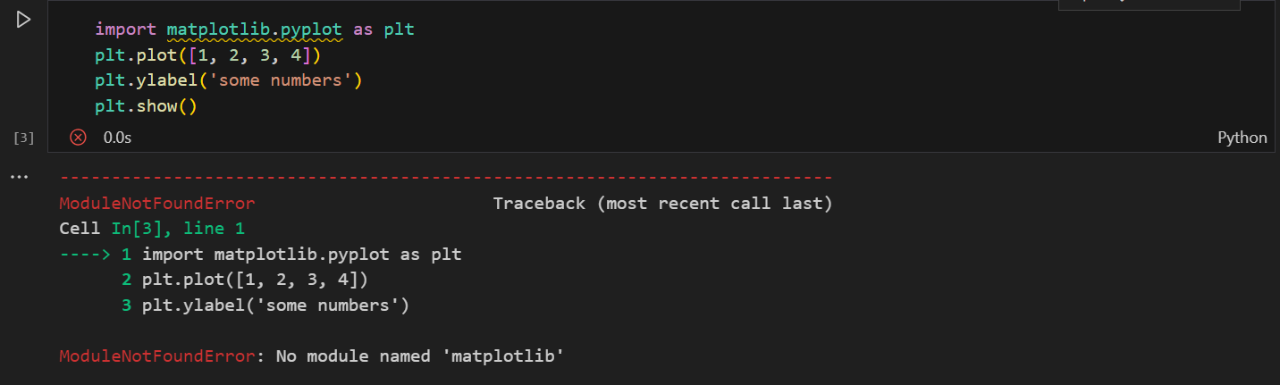
Below is my simple code to invoke a plot via matplotlib python package that I did NOT installed via pip yet. Notice the orange wiggle beneath matplotlib.pyplot in my import statement. This orange wiggle is the way VS Code tells you it could not find such package(s) in the current python environment. When I execute this code cell, I got the expected ModuleNotFoundError.
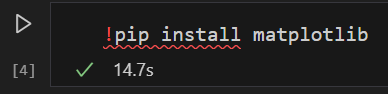
There are different ways to solve this missing-module error. The easiest way is to run the pip install command directly in a code cell. Similar to Jupyter Lab, to run a terminal command within a code cell, simply add an ! sign to the beginning of the command. In my case, I need to type:
!pip install matplotlib
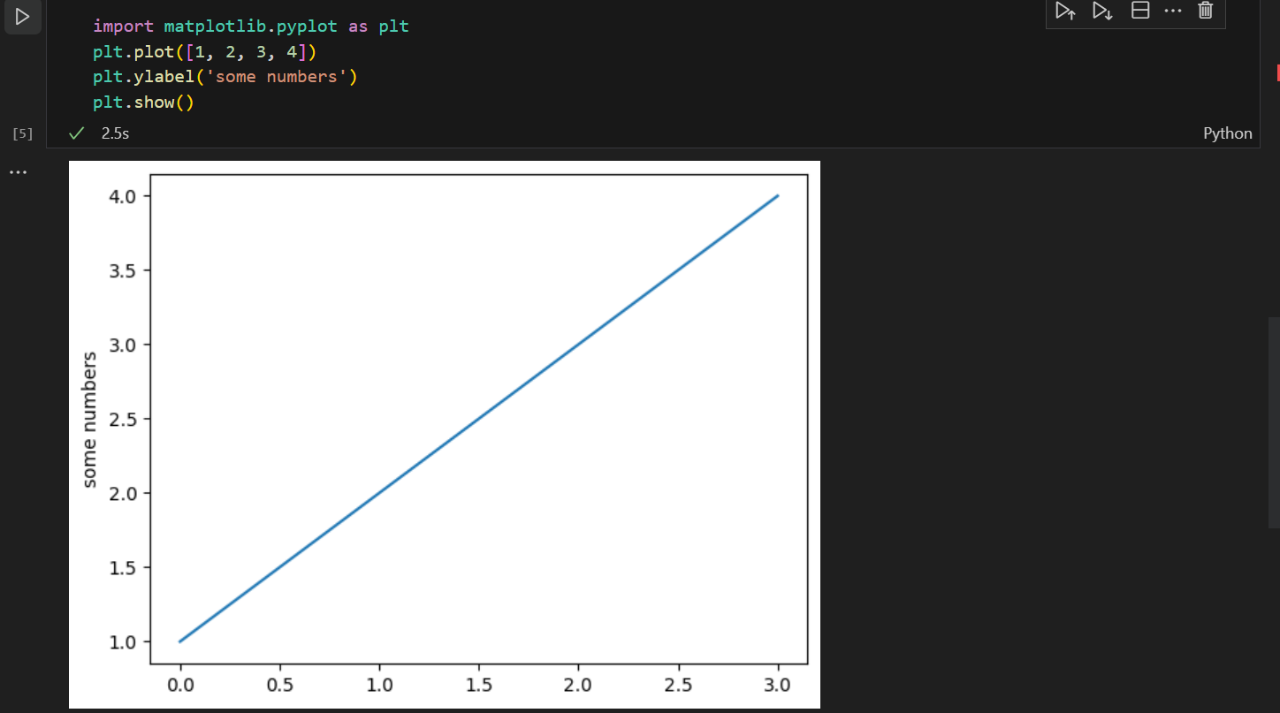
And after that, my code ran and displayed a simple plot.
4. Running a Python Script (.py) Interactively in VS Code
This step is another extension of step 11 in the Run VS Code on OSCER instruction, where you start using VS Code after connecting to the VS Code Tunnel created by the VS Code Server batch job. Here, we show you how you can use VS Code to run a python script file (.py) interactively on your local laptop/PC, using the supercomputer as the backend computing engine.
First, make sure to follow step 11 in the Run VS Code on OSCER instruction to open a directory that you want your python scripts to reside. For example, I'm browsing my test_python directory under my home directory.

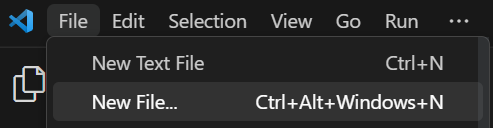
If you have an existing .py python script in your working directory, it should appear on the directory tree on the left panel of VS Code. Here, I'm showing how to create a new script, by clicking on File menu --> New File option and select Python File.

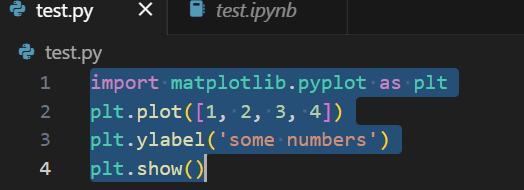
Below is the same code that I showed in step 3 above to invoke a plot via matplotlib.
Assuming you have already installed matplotlib package via pip, as shown in step 3 above, if you attempt to run this code directly via the Play (▶) button at the top right corner of your python script tab, most likely you will encounter an error like this:
UserWarning: Matplotlib is currently using agg,

 which is a non-GUI backend, so cannot show the figure.
This is because when you click the Play button to run this script, VS Code will run your python script in a terminal, and because currently VS Code does not implemented X11-forwarding correctly in a remote tunnel, graphical commands such as matplotlib's plt.show() will fail due to error related to X11-forwarding.
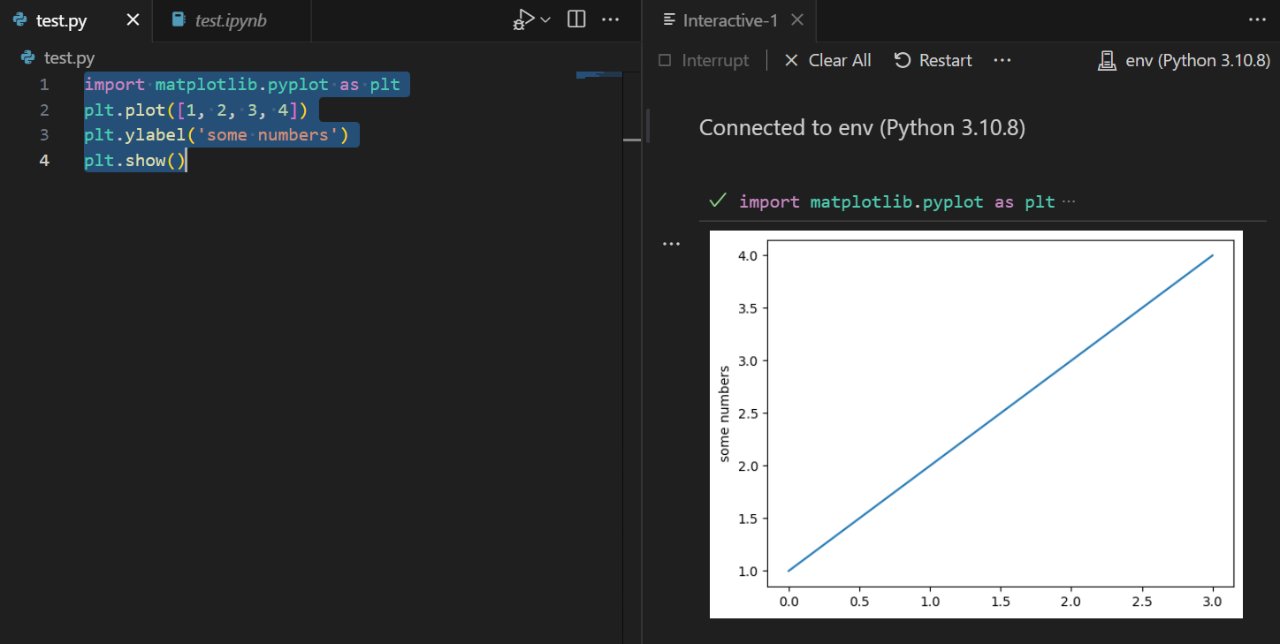
Luckily, there is a convenient workaround: you simply select all the code lines you wish to run, then right click, choose Run in Interactive Window --> Run Selection/Line in Interactive Window. The keyboard shortcut for this action is Shift+Enter.

What VS Code actually does to run code in an interactive Windows is to open a temporary Jupyter notebook, copy your selected code to a code cell of the temporary notebook, and execute it. And because it's a Jupyter notebook, graphic commands like plt.show() are actually using your local PC/Laptop's graphic engine instead of the supercomputer to display the plots - thus skipping X11 forwarding altogether.
That is, you can actually treat your python script as a Jupyter notebook WITHOUT actually creating a Jupyter notebook file. This is another reason why we highly recommend VS Code over the traditional Jupyter Lab / Notebook.