!!!CAUTION!!! Do NOT use VS Code's Remote SSH to connect to schooner!!!
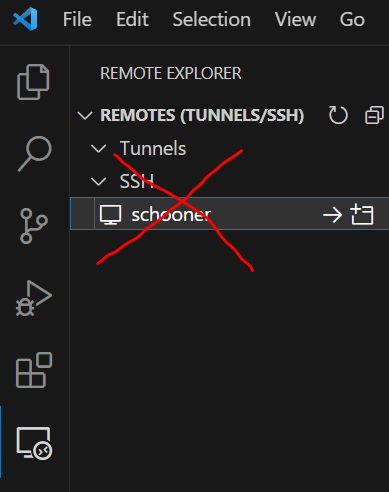
Doing this will create a VS Code Server task on the login nodes, which can consume a large amount of RAM on the login nodes quickly. This could potentially CRASH the login nodes, thus preventing all 1000+ OSCER users from logging in!!!
If you have trouble following the instruction below, feel free to join OSCER weekly zoom help sessions,
Running VS Code on Schooner WITHOUT breaking the login nodes
If you're here, you know how useful and well-supported VS Code is as an IDE (Integrated Development Environment). This guide is an instruction of how to properly debug your code (python script, in particular) on OSCER through the VS Code application on your local PC or laptop. Please read the caution above if you haven't done so.
1. Downloading and Installing VS Code
*** UPDATE 20240625 ***
Starting from VS Code version 1.86.0, Microsoft now drop support for older operating system with glibc<2.28, which include ALL OSCER compute nodes. Until we upgrade our entire supercomputer to a newer operating system, your ONLY choice is to use VS Code Desktop AND CLI version 1.85.2.
That is:
Download VS Code desktop 1.85.2, and correspondingly in step 5, download VS Code CLI version 1.85.2. Link for each operating system is based on the official Microsoft VS Code instruction of how to download previous releases:
- For Windows:
https://update.code.visualstudio.com/1.85.2/win32-x64-archive/stable
- For Linux:
+ Debian/Ubuntu:
https://update.code.visualstudio.com/1.85.2/linux-deb-x64/stable
+ RHEL/Fedora/SUSE:
https://update.code.visualstudio.com/1.85.2/linux-rpm-x64/stable
- For MacOS:
https://update.code.visualstudio.com/1.85.2/darwin-universal/stable
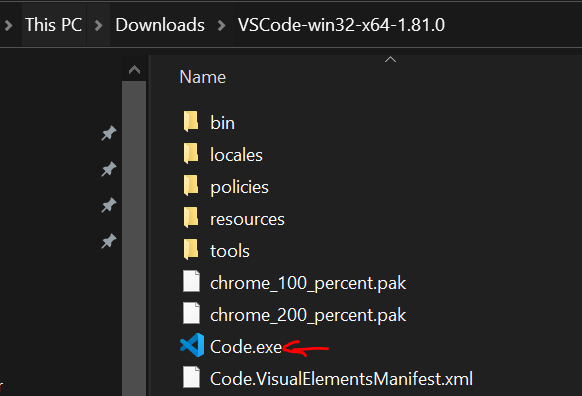
Once you downloaded and extracted the VS Code Desktop 1.85.2 package, we recommend making this version "portable", meaning it will be an independent VS Code version from the one currently installed in your PC/laptop (if you have any). It's very simple: to do so, just create a directory named data inside the extracted directory (where the code/code.exe executable is located) if you're using Windows or Linux, or a directory named code-portable-data alongside with Visual Studio Code.app if you're using MacOS. More detail here:
https://code.visualstudio.com/docs/editor/portable
Also, please remember to remove ~/.vscode and ~/.vscode-server directories whenever you changed your VS Code CLI version, as mentioned in the troubleshooting.
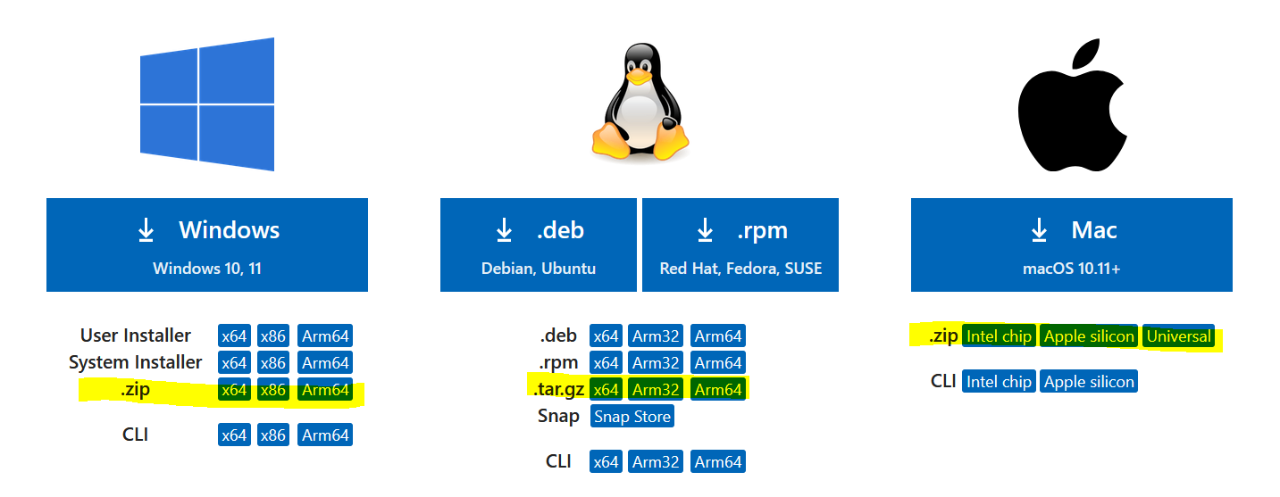
We recommend downloading compressed packages (.zip for Windows and Mac, .tar.gz for Linux). This way, all you need to do after downloading is to extract the compressed package and run the VS Code executable. You do not need to install any application nor require administrative/root privilege.
You WON'T have to do this step for future VS Code runs, only this first time.
2. Installing Remote Tunnels Extension for VS Code
Start VS Code application on your local PC/laptop. If you followed our recommendation to download and extract the compressed package of VS Code, simply double click on the "Code.exe" file to run VS Code in Windows. For Ubuntu, double click on the "code" executable file to run it. For MacOS, double click on the "Visual Studio Code.app" to run it.
Go to the "Extensions" tab of VS Code user interface, search for "Remote - Tunnels" and install it.
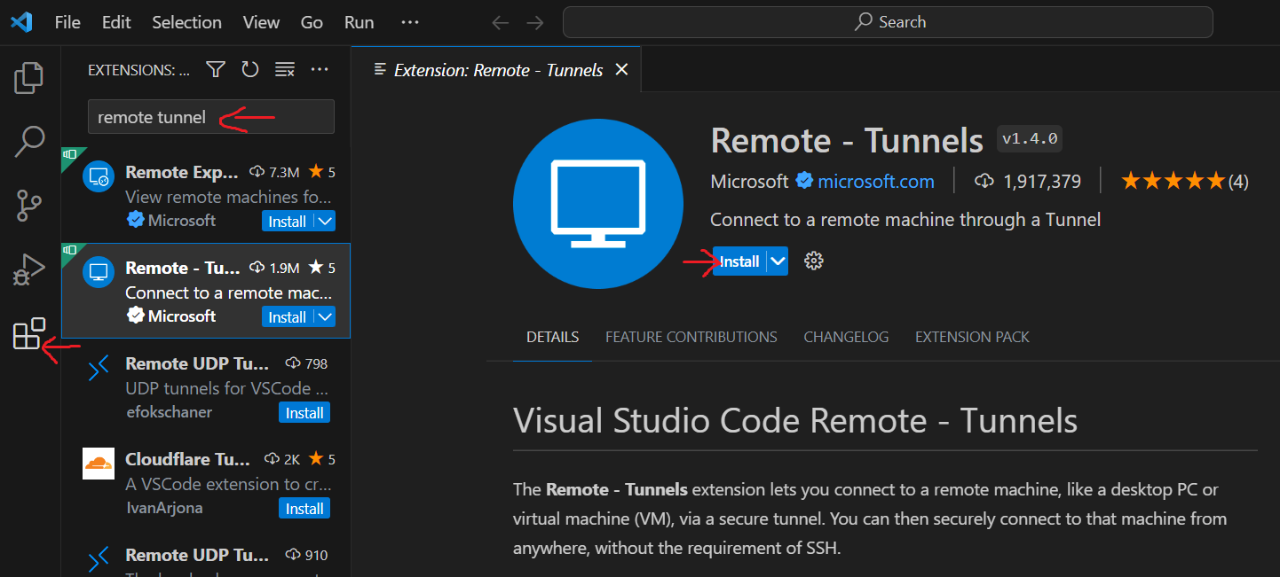
You WON'T have to do this step for future VS Code runs, only this first time.
3. Creating a Github Account
If you do not have a Github account, click here to sign up for one. A Github account is required for VS Code's Remote Tunnels Extension to work. You need to enter an email address to be associated with this Github account, specify a strong password, and then follow the on-screen instruction.
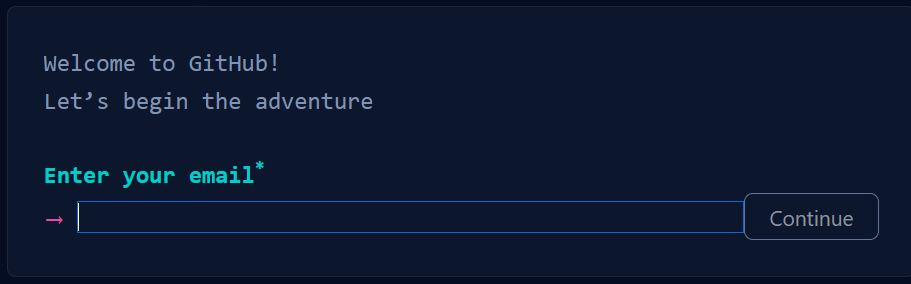
You WON'T have to do this step for future VS Code runs, only this first time.
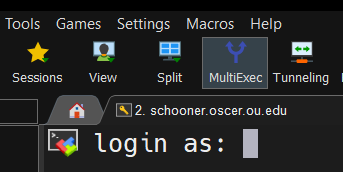
4. Logging in to Schooner
For Windows user, please follow step 1, 2, and 3 in the instruction of how to access OSCER on Windows via MobaXterm.
For Linux and MacOS user, open a terminal and type:
ssh schooner.oscer.ou.edu
Enter your username and password to log in.
5. Getting VS Code CLI (Command-Line Interface)
*** UPDATE 20240625 ***
Starting from VS Code version 1.86.0, Microsoft now drop support for older operating system with glibc<2.28, which include ALL OSCER compute nodes. Until we upgrade our entire supercomputer to a newer operating system, your ONLY choice is to stick with the last compatible VS Code CLI version, which is 1.85.2, and download it via the following command:
curl -Lk 'https://update.code.visualstudio.com/1.85.2/cli-alpine-x64/stable' --output vscode_cli.tar.gz
Then extract it:
 tar -xf vscode_cli.tar.gz

 rm vscode_cli.tar.gz
You should have an executable file named "code" in the current directory. Example:

You WON'T have to do this step for future VS Code runs, only this first time.
6. Creating VS Code Server Batch Script
***UPDATE 20240806***
To ensure VS Code session is created without a strange error, it's best to remove ~/.vscode before calling the code executable in your VS Code server batch script. I have updated the example batch script to reflect this change. The only drawback is that you will have to go to github and authorize the session with the 8-character code every single time you start a VS Code session on the supercomputer.
Next, you'll construct a batch script loading your favorite python environment in your favorite partition and fire up a VS Code server session. In this guide, we will be creating a batch script called "test_vscode.sbatch". To do so type:
nano test_vscode.sbatch
Here is an example of my test_vscode.sbatch batch script to be submitted to the vscode partition, requesting 1 CPU, 2GB memory, and 1 hour run time limit, with Python 3.10.8 module loaded. This assumes you downloaded code CLI version 1.85.2 or below:
 #!/bin/bash

 #

 #SBATCH --partition=vscode

 #SBATCH --output=vscode_%J_stdout.txt

 #SBATCH --error=vscode_%J_stderr.txt

 #SBATCH --chdir=/home/yourusername

 #SBATCH --ntasks=1

 #SBATCH --mem=2G

 #SBATCH --time=1:00:00


 module load Python/3.10.8-GCCcore-12.2.0

 # Load your favorite modules here

 # If needed, activate python virtual environment here

 # Remove ~/.vscode to ensure session can be started without error

 # No need to remove ~/.vscode-server or ~/.vscode-R, so you don't have to reinstall VS Code extensions

 rm -rf ~/.vscode

# Need to redirect /tmp to your scratch to avoid vscode failure on new EL9 supercomputer

export TMPDIR=/scratch/$USER/tmp

mkdir -p $TMPDIR

 export TUNNELNAME=$USER-$(hostname -s)

 echo Tunnel Name: $TUNNELNAME

 $HOME/code tunnel --accept-server-license-terms --name=$TUNNELNAME
(modify yourusername as your OSCER username)
In this example, I'm submitting my VS Code job to a partition called vscode, which is exclusively used for VS Code. In real scenario, most likely you want to run VS Code on the same partition where you plan to submit your final "production-grade" code, such as your group's own partition (e.g. ai2es partition for users in ai2es group). Using normal partition is ok but not recommended, since you may experience long pending time (up to 2 WEEKS of wait time is possible).
You WON'T have to do this step for future VS Code runs, only this first time.
7. Submitting VS Code Server Batch Job
To submit the batch script, type:
sbatch your_vscode_batch_script_file_name
EXCEPT replace your_vscode_batch_script_file_name with the name of your VS Code batch script file.
For example:
sbatch test_vscode.sbatch
You should get some terminal output like this:
Submitted batch job 15988858
That 15988858 number is the job ID of the vscode server batch script.
Once submitted, this job will download and start VS Code Server on the compute node your script is running on, and create a "tunnel", a connection from the compute node to the Microsoft Visual Studio domain global.rel.tunnels.api.visualstudio.com.
See here for more details regarding VS Code Remote Tunnels.
8. Monitoring VS Code Server Batch Job Output
To see if your submitted job was running or still pending, type:
watch squeue --job job_ID
where job_ID is the ID number of the submitted job. For example:
watch squeue --job 15988858

Once you see its status ST turned to R, it means it's running. Hit Ctrl+C to get out of the watch command.
By default, the output of the submitted VS Code job is a file with naming scheme vscode_jobID_stdout.txt . For example, mine is vscode_15988858_stdout.txt. If it doesn't show up right away after the job has ran, give it a minute.

You can "follow" the slurm output for the submitted job by typing:
tail -f job_output_file_name
EXCEPT replace job_output_file_name with the Slurm batch job standard output filename.
For example:
tail -f vscode_15988858_stdout.txt
After about a minute or two, for the first time you run this, the output should show something like:
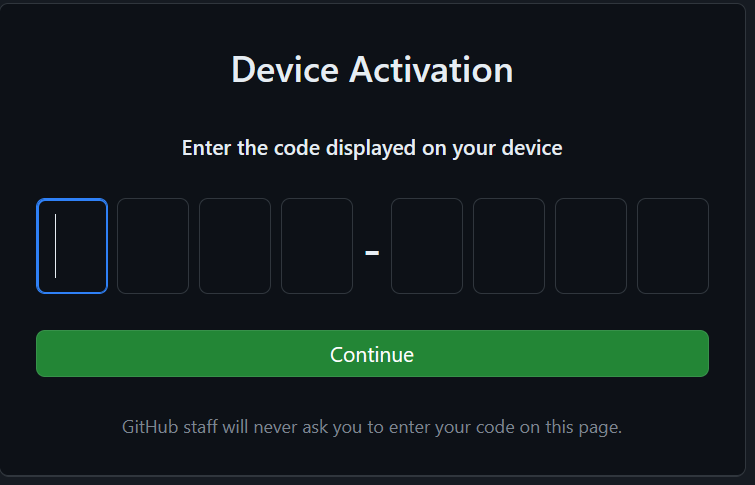
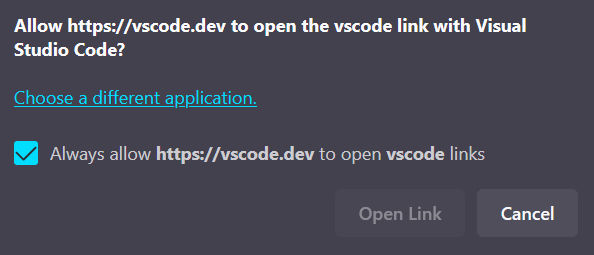
 To grant access to the server,

 please log into https://github.com/login/device

 and use code xxxx-xxxx
Do it as exactly what it said!
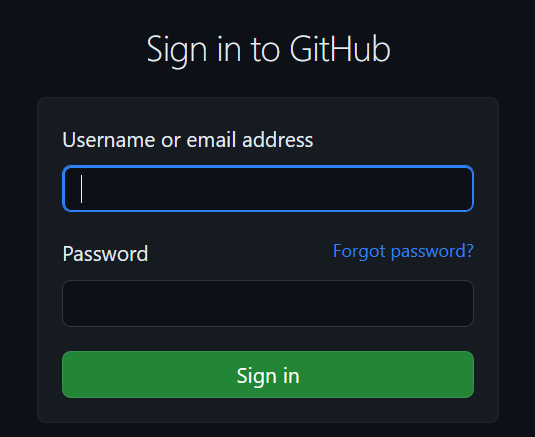
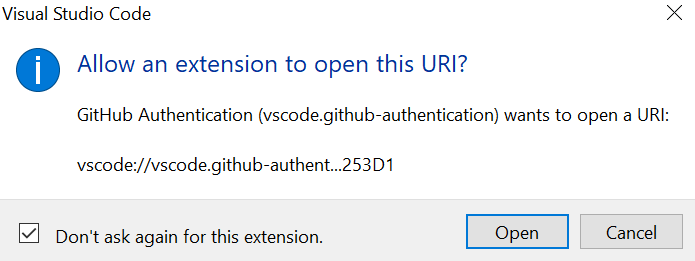
You might need to sign in to your github account for the first time:
Then type the 8-digit code in:
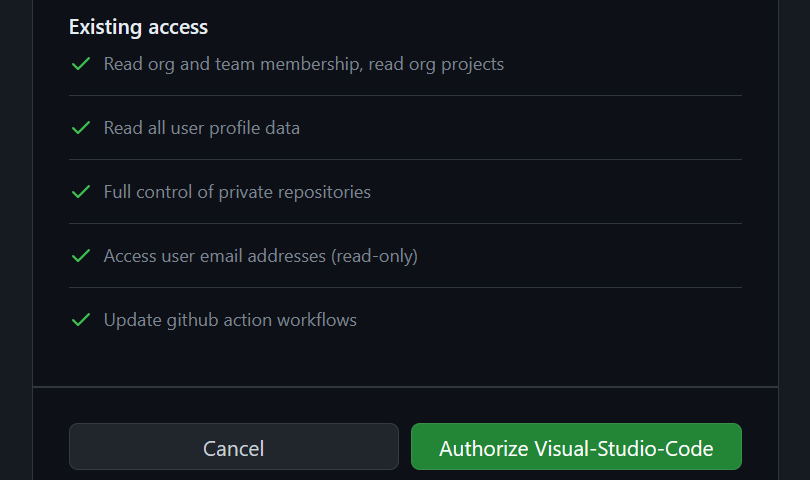
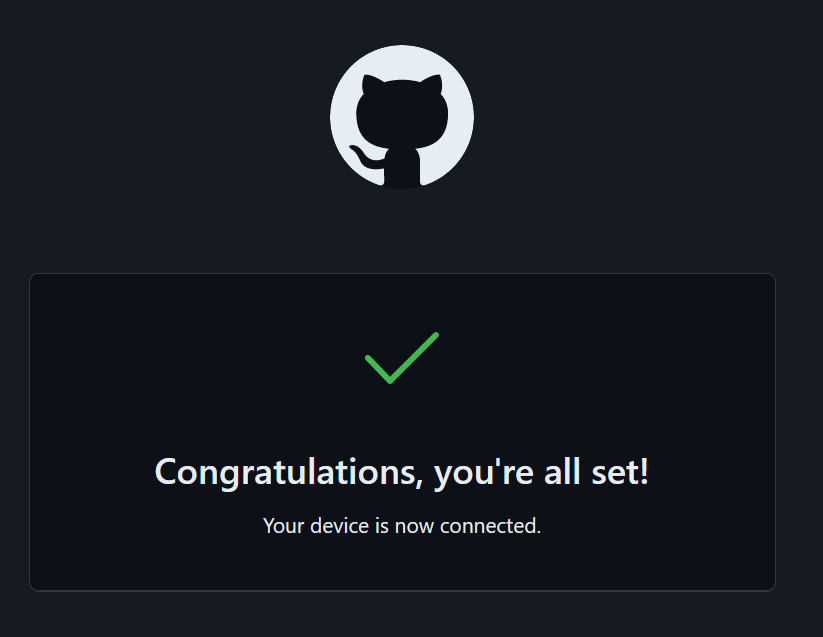
Authorize the supercomputer:
9. Monitoring Tunnel Name
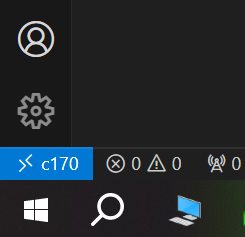
After successfully granting access from your github account to the supercomputer, look back at the tail output as shown in step (8) above. Give it 1-2 minutes to update. When you see something like:
 Open this link in your browser

 https://vscode.dev/tunnel/thanghn90-c170
This means the VS Code server has successfully created a tunnel named thanghn90-c170.
For now, you're done with OSCER. No need to browse that link. You'll do everything from VS Code on your local PC or laptop.
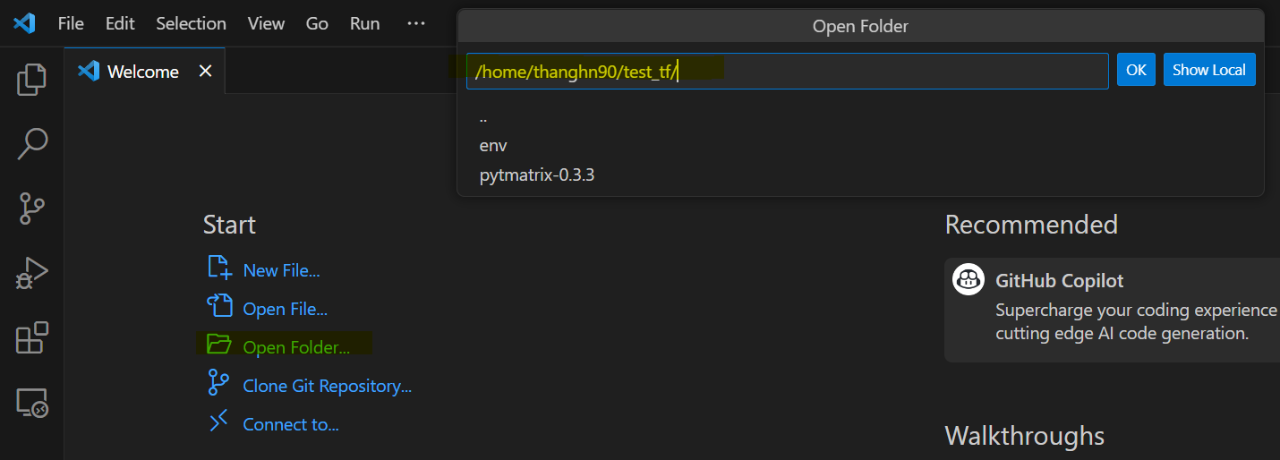
10. Connecting to The Authorized Tunnel on VS Code
If you haven't started VS Code app on your local PC/laptop, please do so. Then hit Ctrl+Shift+P to bring up the command palette, and type:
Remote-Tunnels: Connect to Tunnel
and choose it.

THE FIRST TIME YOU RUN VS CODE THIS WAY, you'll need to allow VS Code to log in to your github account.
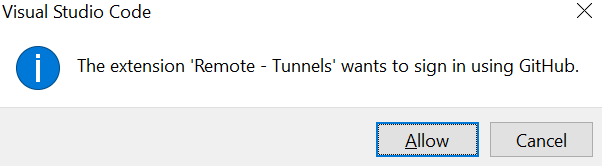
For future VS Code sessions, you WON'T need to do this, because VS Code will already have access to your github account.
Once that's done, select the tunnel name that you granted access to. In my case, it's thanghn90-c170.

If successfully connected, you should see an icon in the lower left corner of VSCode with the tunnel name.
11. Coding and Debugging
Browse to your code and start coding and/or debugging
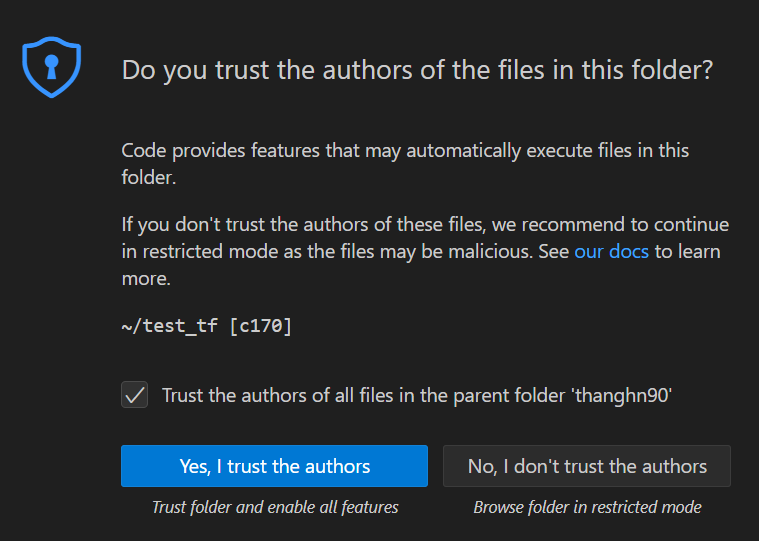
You might need to "trust" yourself the first time.
You'll most likely need to specify a python interpreter for a .py script or a "kernel" for a .ipybn notebook. It's the same thing. You might also need to install Python and Jupyter extensions again on the VSCode server (even though you might have already installed them on your local PC's VSCode).
There is plenty of community support and discussion for VS Code, which this instruction will not be able to cover.
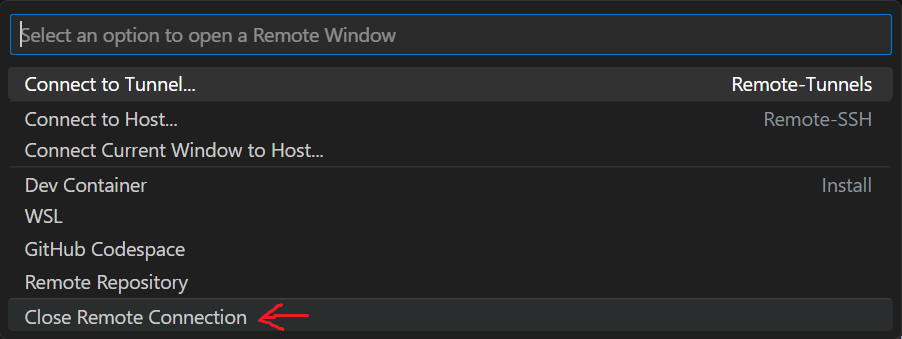
12. Closing and Unregistering a Tunnel
When you finish coding, you MUST close the remote connection by clicking on the lower left connection icon, and choose "Close remote connection".
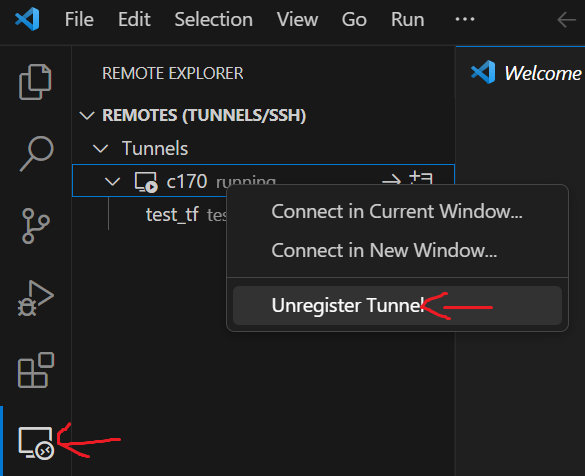
After that, you MUST unregister the tunnel by going to the Remote Explorer tab, right click on the running tunnel (c170 in this example), choose "Unregister Tunnel"
Otherwise you'll encounter an error like this next time you want to start the tunnel again with your batch script:
 error Could not create tunnel with name: thanghn90-c170

 Reason: tunnel name already in use
13. Cancelling VS Code Server Batch Job
Finally you MUST end the vscode server job on OSCER:
scancel job_ID
EXCEPT replace job_ID with your VS Code Server Job ID.
For example:
scancel 15988858
Note For Subsequent Runs of VS Code Server Batch Job
- Start from step (4) (logging in to schooner), skip step (1), (2), and (3) (VS Code download, Remote Tunnels Extension installation, and Github account creation).
- Skip step (5) and (6) (VS Code CLI installation and batch script creation).
- Authorize the vscode server with 8-digit code in step (8), and continue step (9), (10), and (11).
- When you're done, don't forget to close and unregister the tunnel in step (12), and cancel your job in step (13).
Troubleshooting
Error after upgrading/downgrading VS Code CLI
If you encounter any weird issue after upgrading/downgrading your VS Code CLI in your home directory, please type:
rm -rf ~/.vscode
This will remove the ~/.vscode directory, allowing you start fresh. It does mean you will have to reauthenticate your tunnal with the 8-character code as described in step 8.
Exceeding Time Limit of VS Code Server Job
In case your VS Code Server batch job gets killed due to time limit, please do step (12): closing tunnel connection and unregistering the closed tunnel. Then redo step (7) to (11), that is, resubmitting VS Code Server batch job, monitoring batch job output, connecting to the authorized tunnel, and start coding/debugging.
Plotting with R Failed due to X11 Forwarding Error
If you want to use VS Code to run R instead of Python and encounter an X11 forwarding error when plotting a graph/image, you need to close VS Code GUI on your local PC/laptop, install some extra R libraries on your OSCER account, and run R code in a jupyter session of VS Code.
To do so, log in to your account on OSCER if you haven't done already. If you're using R through conda (miniconda/anaconda), load your conda environment if needed. Otherwise, you first need to load R module. For example, to load R 4.2.1, type:
module load R/4.2.1-foss-2022a
Then start R by typing:
R
Within R console, type these three statements:
 install.packages('languageserver', repos='https://cran.r-project.org/')

 install.packages('IRkernel', repos='https://cran.r-project.org/')

 IRkernel::installspec()
These three statements will install R languageserver and IRkernel so that VS Code would be able to recognize R language in a jupyter session. Once done, hit Ctrl+D (or Command+D in MacOS) to exit the R console.
If your VS Code server batch script was not designed for R, please make sure to load R module in it. For example, below is the content of my batch script to set up a VS Code Server with R: #!/bin/bash
#
#SBATCH --partition=vscode
#SBATCH --output=vscode_%J_stdout.txt
#SBATCH --error=vscode_%J_stderr.txt
#SBATCH --chdir=/home/yourusername
#SBATCH --ntasks=1
#SBATCH --mem=4G
#SBATCH --time=1:00:00
module load R/4.2.1-foss-2022a
# Load your favorite modules here
# If needed, activate python virtual environment here
# Remove ~/.vscode to ensure session can be started without error
# No need to remove ~/.vscode-server or ~/.vscode-R, so you don't have to reinstall VS Code extensions
rm -rf ~/.vscode
# Need to redirect /tmp to your scratch to avoid vscode failure on new EL9 supercomputer
export TMPDIR=/scratch/$USER/tmp
mkdir -p $TMPDIR
export TUNNELNAME=$USER-$(hostname -s)
echo Tunnel Name: $TUNNELNAME
$HOME/code tunnel --accept-server-license-terms --name=$TUNNELNAME
(modify yourusername as your OSCER username)
Once you have submitted a VS Code server job for R, open VS Code GUI on your laptop/local PC, then connect to your remote tunnel, and open your working directory. To be able to show R plot without X11 forwarding error, you will need to run your R code through a VS Code's Jupyter session.
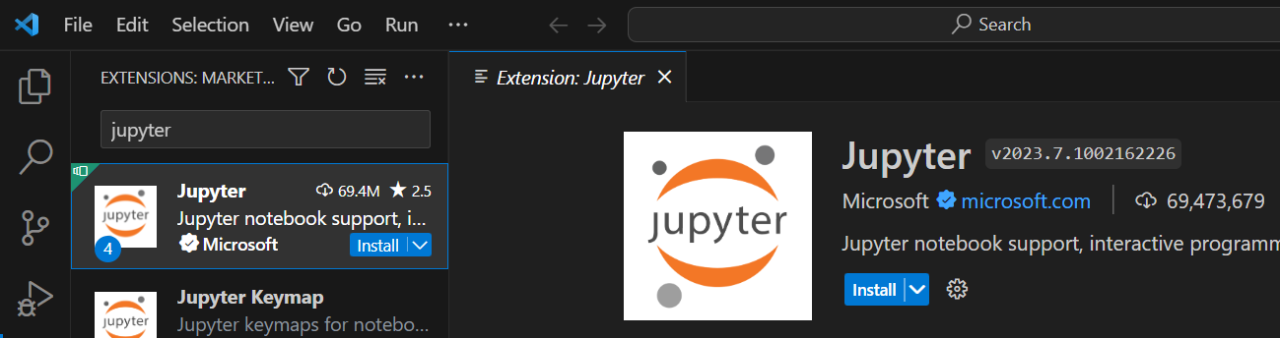
If you haven't installed Jupyter extension, after connecting to your remote tunnel, search "jupyter" in the VS Code extension tab, and install it.
To open a new Jupyter notebook, hit Ctrl+Shift+P (or Command+Shift+P on MacOS) to open the command pallete, and type:
Create: New Jupyter Notebook
And select it.

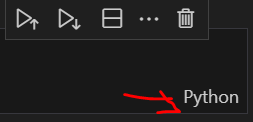
By default, a Jupyter notebook will set Python as its default language. Click on it and change it to R.

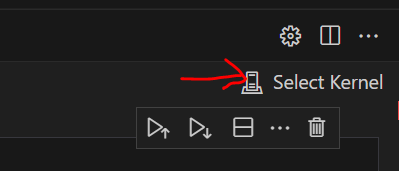
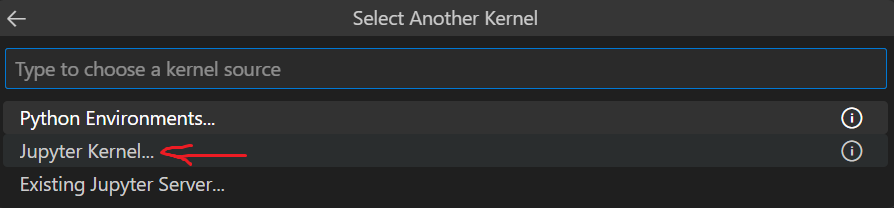
After that, you need to select R kernel (i.e. the R executable, or "interpreter") for your Jupyter session, by clicking on the Select Kernel icon near the top right corner, then choose Jupyter Kernel option, and then click on the loaded R executable.

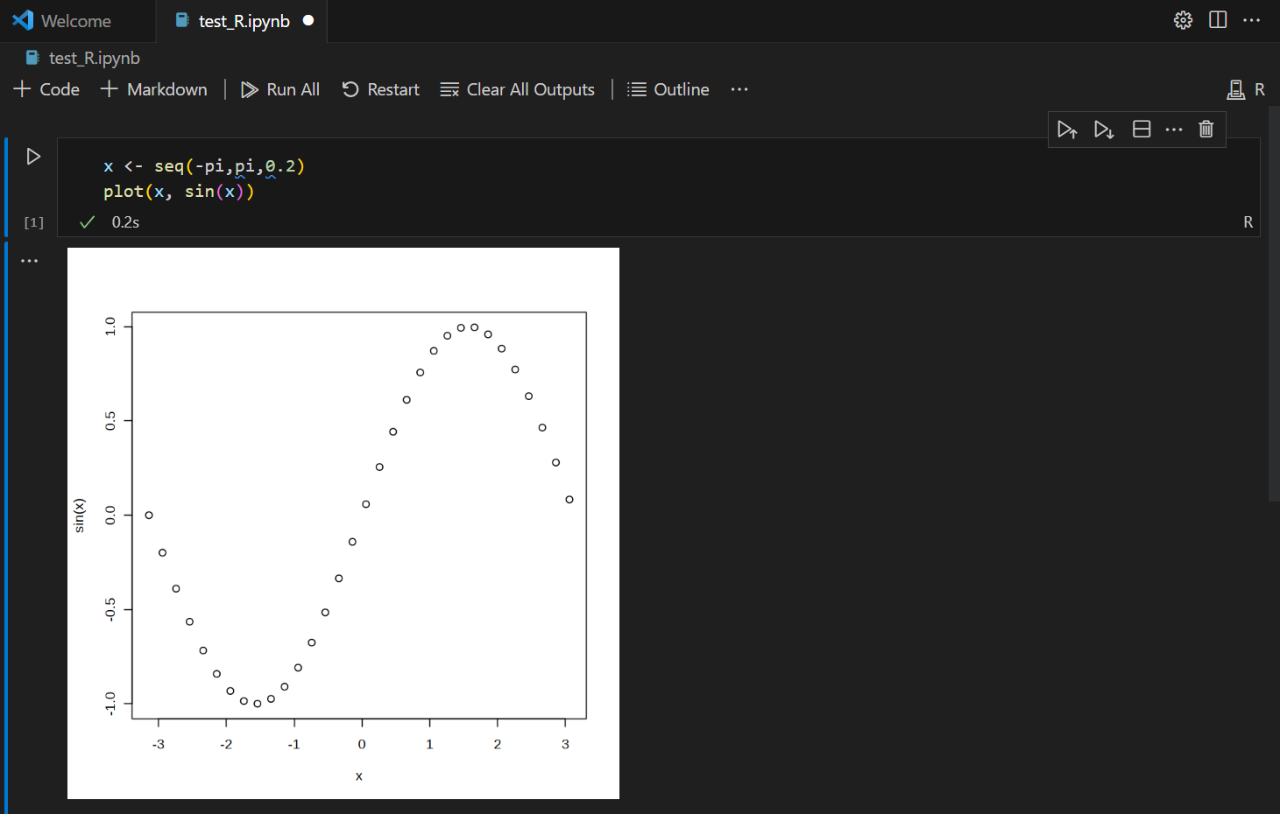
Once you set R kernel to your Jupyter session, you can now copy/paste your R code to a Jupyter code block and run it. Below is an example sine-wave plot with R code in a Jupyter notebook.