!!! CAUTION !!! Please do NOT run python command directly in the SSH terminal!
By doing so, you are running a potentionally intensive computing task on OSCER login machines. Intensive computing tasks had a tendency to crash the login machines, thus preventing all other 1000+ OSCER users from logging in! Please make sure to read the Python Basic Setup instruction to understand how to properly set up a Python environment and submit a Python batch job on the supercomputer.
If you have trouble following the instruction below, feel free to join OSCER weekly zoom help sessions.
Jupyter Tunneling Setup
OSCER has a dedicated OnDemand server to help researchers run python code on Jupyter Lab or Jupyter Notebook. If you need to run Jupyter Lab/Notebook with your own customized python environment, we highly recommend running your python code on a VS Code Jupyter notebook. VS Code has become increasingly user-friendly and feature-rich when it comes to Python code development, with plenty of community support and online examples you can follow.
However, if you still prefer the traditional Jupyter Lab / Notebook, you will need to submit a Jupyter server batch job and connect to your Jupyter session via SSH tunneling. The steps are as below:
1. Setting Up a Python Environment for Jupyter
To set up an environment for a Jupyter batch job submission, we need to load your python environment and install jupyter and notebook packages if you have not done already.
- If you use conda/miniconda/mamba
baseenvironment, you're all set after logging in to OSCER.
If you set up a different conda environment, such aspicrust2, as mentioned in our Mamba (Conda) instruction, the safest way that guarantees your job would run without any error related to the conda environment setup is to activate your conda environment AT THE END of your terminal configuration file (~/.bashrcfor bash shell, or~/.zshrcfor zsh shell, or~/.cshrcfor csh shell, or~/.tcshrcfor tcsh shell - you get the idea).
That is, use a text editing program like vi or nano to edit your terminal configuration file:
nano ~/.bashrc
Then add this line to the END of it:
mamba activate your_conda_environment
For example, to loadpicrust2conda environment, type this line at the end of your terminal configuration file:
mamba activate picrust2
Your terminal should now started with(picrust2)whenever you log in. Please log out and log back in for it to take effect.
If you set up a "vanilla" python virtual environment WITHOUT conda/miniconda/mamba, as in our Python Basic Setup instruction, please load the corresponding Python module and activate your python virtual environment. For example, to loadPython/3.10.8-GCCcore-12.2.0and activatetest_envenvironment, type:
 module load Python/3.10.8-GCCcore-12.2.0

 source ~/test/test_env/bin/activate
- Next, if you have not installed
jupyterandnotebookpackages, type:
pip install jupyter notebook
You only need to installjupyterandnotebookpackages ONCE.
2. Creating a Jupyter Batch Script and Submitting It
Depending on the python environment you use with Jupyter:
- If you use conda/miniconda/mamba, please make sure to modify your terminal configuration file as mentioned in step 1 above. Then, follow the example batch script below. This script will execute a Jupyter NOTEBOOK server job on partition
debug, requesting 1 CPU, 1GB memory, and 30 minutes of run time:#!/bin/bash
#
#SBATCH --partition=debug
#SBATCH --output=jupyter_%J_stdout.txt
#SBATCH --error=jupyter_%J_stderr.txt
#SBATCH --chdir=/path/to/your/working/directory
#SBATCH --ntasks=1
#SBATCH --mem=1G
#SBATCH --time=00:30:00
echo Hostname short: $(hostname -s)
export RANDOM_PORT=$(shuf -i 8900-9900 -n 1)
echo Random port:
echo $RANDOM_PORT
echo Host IP Address:
export HOST_IP_ADDRESS=$(getent ahosts $(hostname -s)|egrep -v ::|grep RAW|cut -d " " -f 1)
echo $HOST_IP_ADDRESS
jupyter-notebook --no-browser --port=$RANDOM_PORT --ip $HOST_IP_ADDRESS
(modify/path/to/your/working/directoryas the full absolute path to where you want to run your python script in)
If you use a python virtual environment WITHOUT conda/miniconda/mamba, follow the example batch script below. This script will loadPython/3.10.8-GCCcore-12.2.0and activatetest_envenvironment, then execute a Jupyter NOTEBOOK server job on partitiondebug, requesting 1 CPU, 1GB memory, and 30 minutes of run time:#!/bin/bash
#
#SBATCH --partition=debug
#SBATCH --output=jupyter_%J_stdout.txt
#SBATCH --error=jupyter_%J_stderr.txt
#SBATCH --chdir=/path/to/your/working/directory
#SBATCH --ntasks=1
#SBATCH --mem=1G
#SBATCH --time=00:30:00
module load Python/3.10.8-GCCcore-12.2.0
source ~/test/test_env/bin/activate
echo Hostname short: $(hostname -s)
export RANDOM_PORT=$(shuf -i 8900-9900 -n 1)
echo Random port:
echo $RANDOM_PORT
echo Host IP Address:
export HOST_IP_ADDRESS=$(getent ahosts $(hostname -s)|egrep -v ::|grep RAW|cut -d " " -f 1)
echo $HOST_IP_ADDRESS
jupyter-notebook --no-browser --port=$RANDOM_PORT --ip $HOST_IP_ADDRESS
(modify/path/to/your/working/directoryas the full absolute path to where you want to run your python script in)
You can replacejupyter-notebookcommand withjupyter-labto start a Jupyter LAB session instead of a Jupyter NOTEBOOK session.
Then save the batch script to a file, e.g.jupyter.sbatch.
- To submit a Jupyter server batch job, type:
sbatch your_jupyter_batch_script_name
Such as:
sbatch jupyter.sbatch
You should see a terminal output like:
Submitted batch job 16110538
That16110538is your Jupyter server job_ID. You will need this number to identify the port and address for your Jupyter session in the next step.
3. Identifying The Port and Host Address of The Jupyter Session
After submitting a Jupyter server job on the supercomputer, you can monitor its status by typing:
watch squeue -j job_ID
such as:
watch squeue -j 16110538
When the job's status ST turn to R, it means it's running.
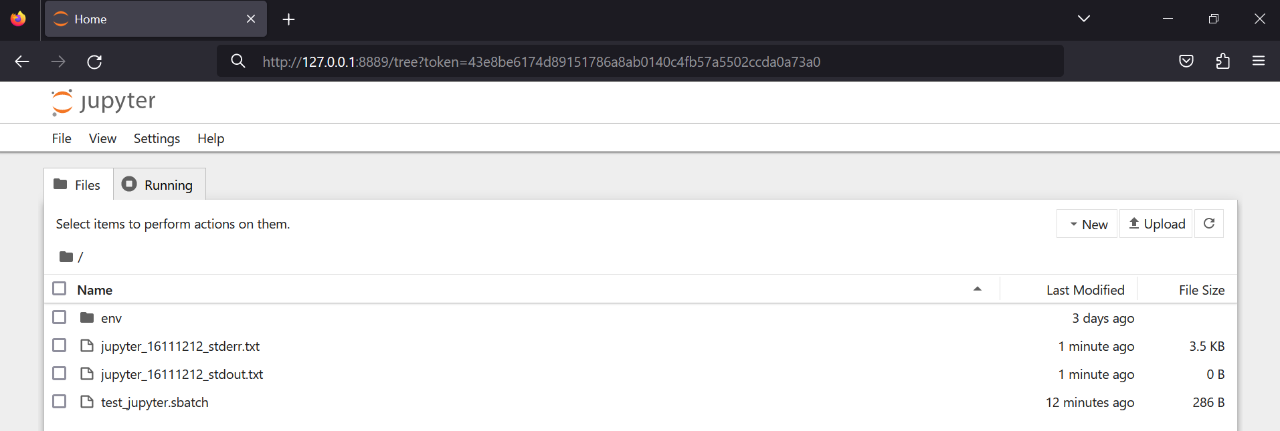
If you follow the example batch scripts in the above step 2, there should be two text files generated after your Jupyter job is running:
jupyter_job_ID_stdout.txt (such as jupyter_16110538_stdout.txt), which stores the screen output of your job, and
jupyter_job_ID_stderr.txt (such as jupyter_16110538_stderr.txt), which stores the error messages of your job.
Strangely enough, Jupyter server's port number and host address is actually written out in the error messages of your Jupyter job. Therefore, you will need to follow the error message text file to identify the port and host address of your Jupyter session, by typing:
tail -f jupyter_job_ID_stderr.txt
Such as:
tail -f jupyter_16110538_stderr.txt
You should get a message like this:
 Or copy and paste one of these URLs:

 http://10.251.86.43:9830/lab?token=684a13d8516689549560402c8c3eb9e8cc81a6d6caa09e64

 http://127.0.0.1:9830/lab?token=684a13d8516689549560402c8c3eb9e8cc81a6d6caa09e64
This means your Jupyter session's port number is 9830 and host ip address is 10.251.86.43.
4. Connecting to The Jupyter Session via SSH Tunneling
On your local PC/laptop, if you are using Linux or MacOS, open a terminal and type:
ssh -f -N -L port:host_ip_address:port your_oscer_username@schooner.oscer.ou.edu
For example, using my username and my Jupyter session's information, I need to type:
ssh -f -N -L 9830:10.251.86.43:9830 thanghn90@schooner.oscer.ou.edu
Enter your OSCER password if prompted.
This command opens a "tunnel" from port 9830 of my local PC/laptop, through SSH port (22) of OSCER login node (schooner.oscer.ou.edu), authenticated with my OSCER account, into port 9830 of compute node 10.251.86.43 on partition debug.
On Windows, we recommend using MobaXterm for SSH tunneling purpose. If you haven't installed MobaXterm, please see the MobaXterm section of our Access OSCER Systems instruction. Open MobaXterm and click on the Tunneling button:

Click on the New SSH Tunnel butotn at the bottom left corner of the MobaSSHTunnel dialog.
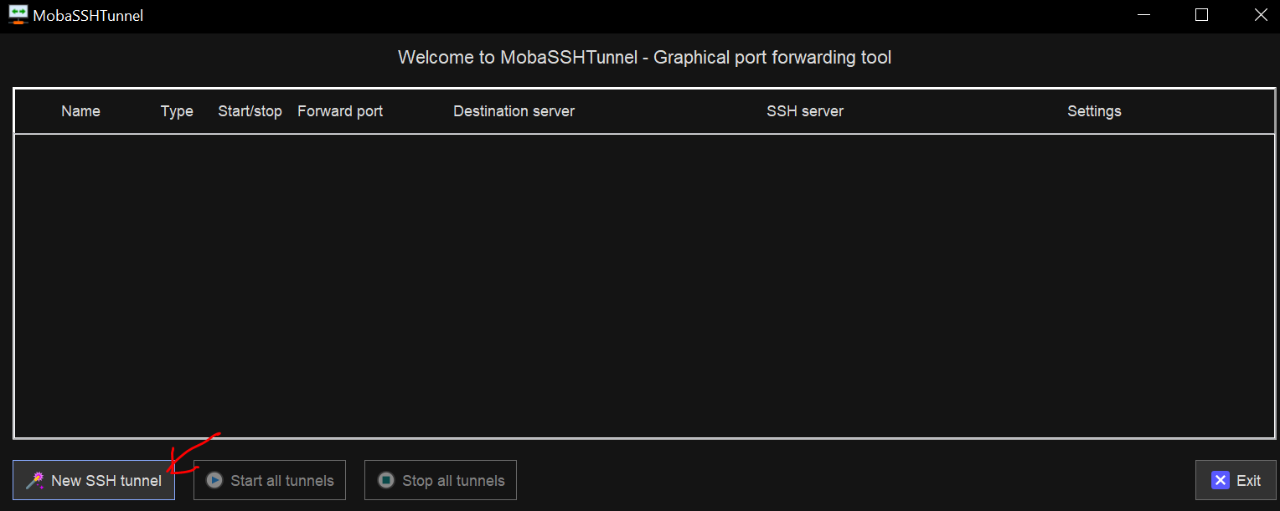
Under the Local Clients section (left), type:
- The port number of your Jupyter session (e.g.
9830) into the Forwarded Port.
Under the SSH Server section (bottom right), type:
schooner.oscer.ou.eduinto the SSH Server,- Your OSCER user name into the SSH Login, and
22into the SSH Port.
Under the Remote Server section(top right), type:
- The host ip address of your Jupyter session (e.g.
10.251.86.43) into the Remote Server, and - The port number of your Jupyter session (e.g.
9830) into the Remote Port.
Then click the Save button.

Then, click the Play (▶) button to start the tunneling. Enter your OSCER password if prompted.

It may take a minute for the tunneling to be started. Once the tunneling is started, you should see the Play (▶) button greyed out, and the Stop (■) button brighten up.

After the Jupyter tunnel is created, for both Windows, Linux, and MacOS, you can now open an internet browser in your local PC/laptop and enter the last http address you got in step 3 when following the error messages of your Jupyter server job. For example:
http://127.0.0.1:9830/lab?token=684a13d8516689549560402c8c3eb9e8cc81a6d6caa09e64
5. Improving Jupyter Coding Experience
Some tips when running Jupyter Lab / Notebook:
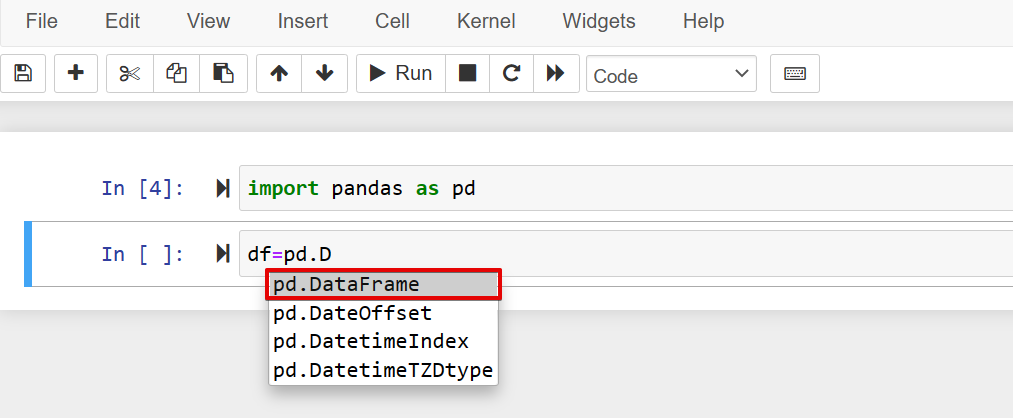
- While typing code, hit the Tab key on your keyboard to show a dropdown list of code suggestion.
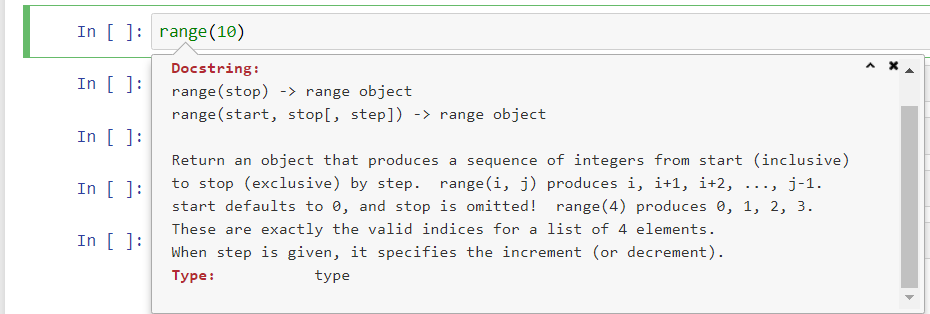
- While typing arguments for a function, hit Shift+Tab to bring up the function's docstring (i.e. a brief description of the function and its arguments) if there is any.
- To enable dark mode in Jupyter Lab, simply go to Settings --> Jupyter Lab Theme --> select Jupyter Lab Dark.

- To enable dark theme in Jupyter Notebook, you first need to install jupyterthemes package via pip, then change Jupyter Notebook theme via
jt -t onedorkcommand.
6. Closing a Jupyter Tunnel
To close a Jupyter tunnel in Linux or MacOS, type in a terminal on your local PC/laptop:
ps aux |grep port:host_ip_address
with port as the port number of your Jupyter session and hostname as the host name of your Jupyter session. For example:
ps aux |grep 9830:10.251.86.43
Then find the process ID associated with the "ssh -f -N -L" command, and kill that process ID by typing:
kill -9 process_ID
For example, my ssh -f -N -L command is associated with process ID 18418:
 thang 18418 0.0 0.0 41488 684 ? Ss 17:27 0:00

 ssh -f -N -L 9830:10.251.86.43:9830 thanghn90@schooner.oscer.ou.edu
I will need to type:
kill -9 18418
to close my Jupyter tunnel.
To close a Jupyter tunnel in Windows, click the Stop (■) button in the MobaSSHTunnel dialog. You can also close MobaXterm and all SSH tunnels will be automatically closed.
If your Jupyter server job is still running, you MUST cancel it by typing in OSCER terminal:
scancel job_ID
where job_ID is your Jupyter server job ID, such as:
scancel 16110538