
Stellic is OU's new online degree management tool. Stellic's robust features allow you to visualize and design a student's degree progress. With Stellic, students can track their progress and ensure on-time degree completion.
Increases student engagement by allowing them to track their own degree plans and progress
Provides students with transparency of program requirements
Easy-to-use reporting tools for proactive outreach
Student and course-centered analytics
At-a-glance progress tracking
There are many ways to find students or groups of students within Stellic. You can filter your student search to pull students with a certain GPA, specific requirements left to plan, or many other options. Within the search results, you’ll see information on each student, such as affiliated programs, courses taken and remaining, and alerts. Click on any student to view their full plan and profile.
You can save a search filter as a ‘Quick Filter’ to use again. This is also a great way to keep tabs on certain students, since the number of students who meet the search criteria can change between visits.


You can also print a bulk audit report from your search results, using the printer button above your student search results.
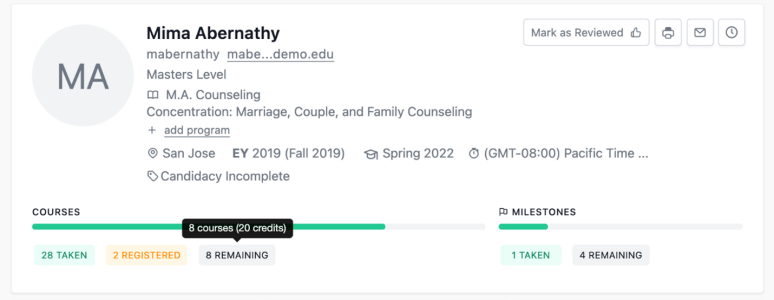
Student progress can be viewed at a snapshot by looking at the student's progress bar at the top of their profile. This will show at-a-glance the number of taken and remaining courses. Hover over the progress bar to view details on taken and remaining credits. If the student has milestones (non-course requirements) listed in their requirements, they will have a separate progress bar to view their milestone progress.
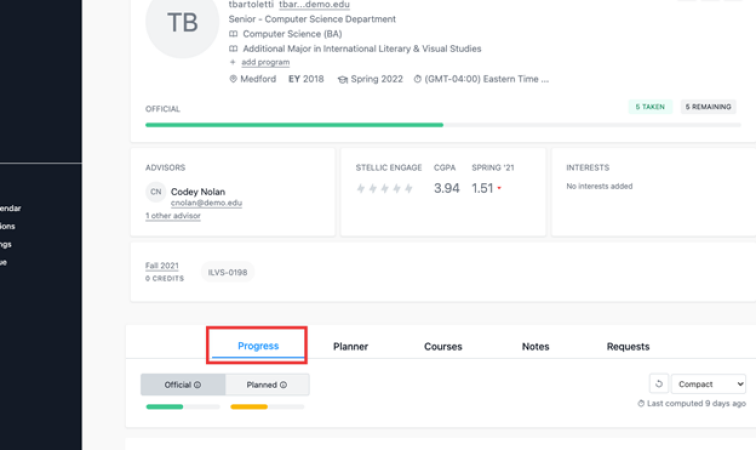
Scroll down to see the Progress tab, which shows all program requirements, (including required courses and electives) and degree audits. Any transfer courses will be automatically added to the degree plan.

Note: An audit will only display for any programs that have requirements input into Stellic that match the student's criteria (such as entry year, term, declared program(s)). If no audit has been built for that particular program, you will see a list of unmatched courses without any program requirements.
You can toggle back and forth between a student's official and planned audit by selecting the appropriate option. The option that has been actively selected appears in a darker shade.
Each program will have a breakdown of courses/units taken and planned.

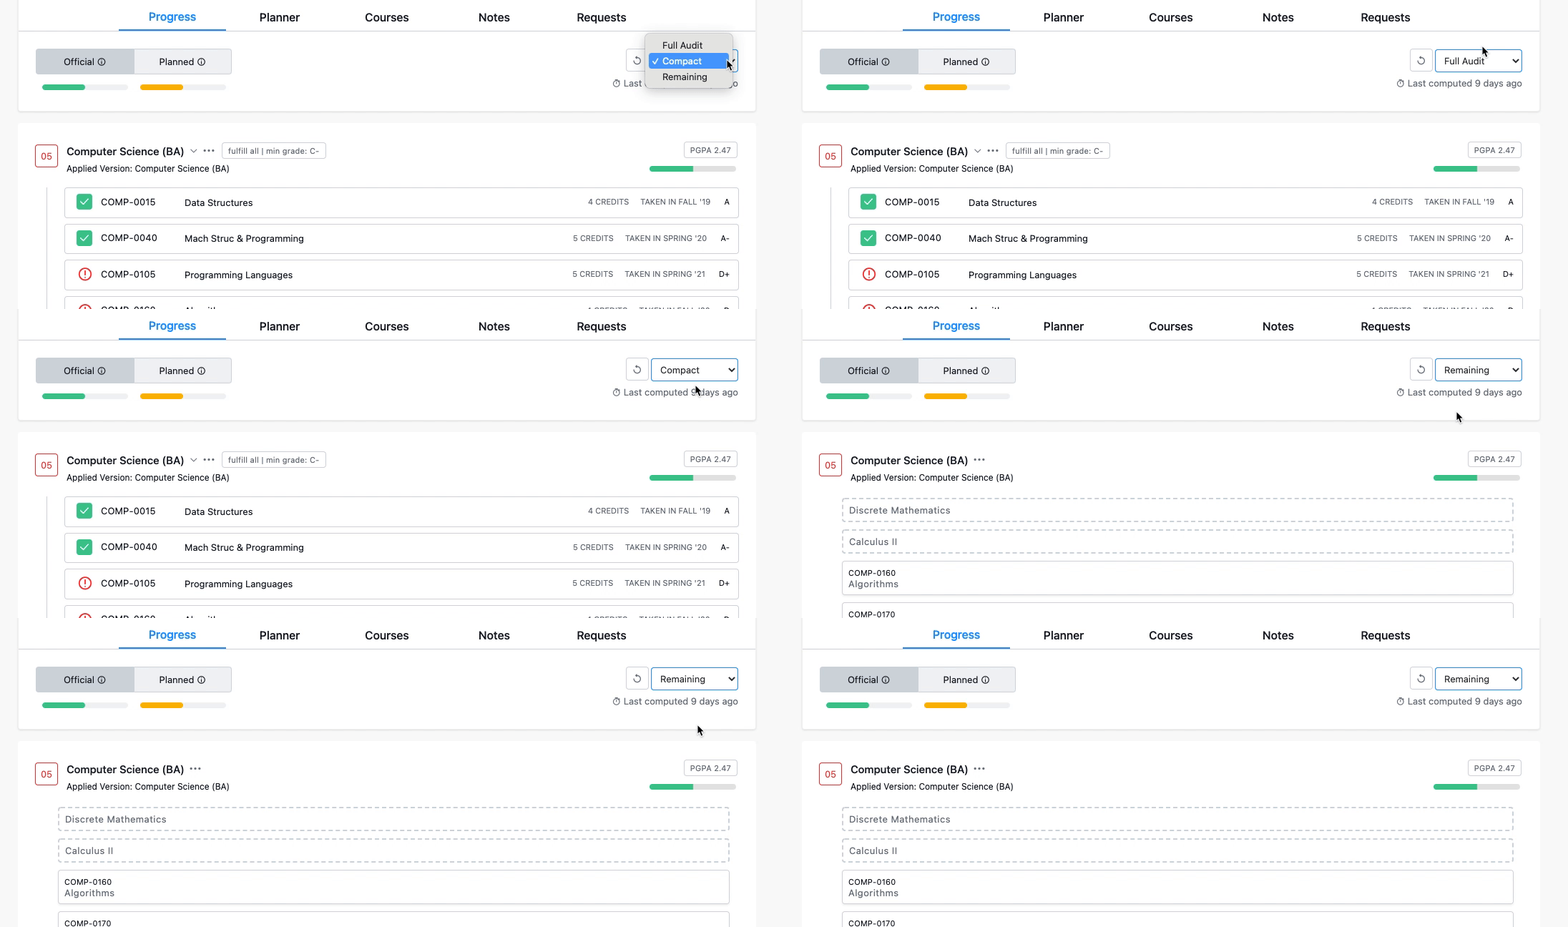
If you hover over the units total, we’ll show the breakdown of units by taken, registered, or planned. You also have the option to view the full audit, a compact version, or just the requirements remaining for the student.

Green checkmark: The course/requirement has been completed. These are already taken and passed classes, or requirements that are completely fulfilled. These will remain the same in the official and planned audit.

Red box: The course/requirement still needs to be completed. In your official audit, any section not taken or registered will show as red. In your planned audit, any section that is not yet in your plan will be red.

Yellow double checkmarks: The course is currently being taken this term.

Yellow single checkmark: The course/requirement is in the plan and will be satisfied once completed. Official = only classes registered for the current semester will show in yellow. Planned = all the classes you already have planned out with Stellic, even years ahead, will show yellow.

Red numbers in a red box: The number of remaining courses for a requirement. Non-course requirements are not included in this total.

Green chainlink icon: The course is double counting with a requirement in another program. Hover over the link symbol for details on where the class is double-counting.

Green circular arrow: The course has been taken more than once. This icon only appears if the course has been taken more than once and isn’t permitted to count for more than one requirement.

Red circle with an exclamation point: The course is taken/registered but not counting for the requirement. (Ex. A course that doesn't have a high enough grade to fill the requirement, or a course that is counting for a different requirement instead.) You'll also see these courses at the bottom of the audit, under Unmatched Courses.

You may (depending on the settings of your school) also have a double-headed arrow icon next to the course name. This indicates that the requirement is being filled by a course that your institution has designated as equivalent with the course noted in the audit.

This symbol indicates that the course is counting for a requirement because of a constraint added on a higher level (parent) requirement. For example, you may have a constraint in Requirement A that expects students to fulfill a total number of credits. Nested within Requirement A might be Requirement B, which has a “fulfill any” constraint with a list of courses. Students only need to take one course from the list to fulfill Requirement B, but the audit may show additional courses matching to fulfill Requirement B in order to meet the total credits required by the parent Requirement A. Those additional courses would show this symbol.
Unmatched Courses - These are courses that are taken or in plan, but that do not count towards anything in the audit, even the unit total. They could be unmatched because the letter grade is not sufficient to fulfill the audit, or because another course is filling the audit instead.
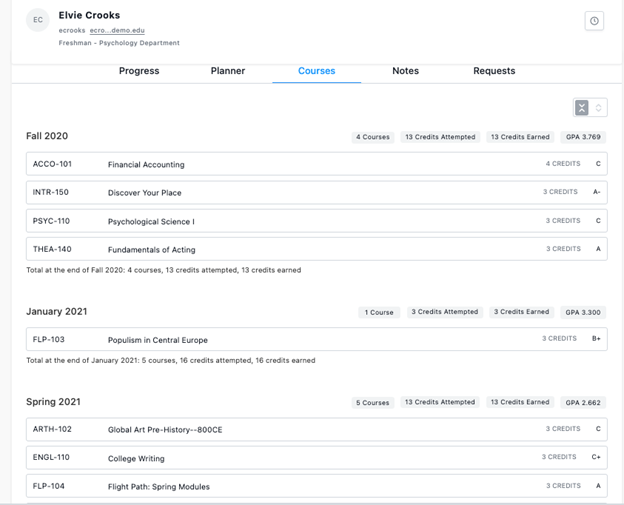
The Courses view shows taken courses by semester. This view includes information about credits and grades received for each course. You can also see the GPA and total credits for each semester. Clicking on a course will show which requirement a course counted for.
The search bar located at the top of the Stellic log-in page searches throughout the platform. Start typing into the search bar for a quick search on any keyword. In the below example, typing in the letters "C-H-E" generate results across programs and students.

The search bars located within specific pages will search only content related to the page - so, for example, the search bar located on the Students page will only search your keywords within the context of students, and the search bar located on the Programs page will search for your keywords within the context of Programs.

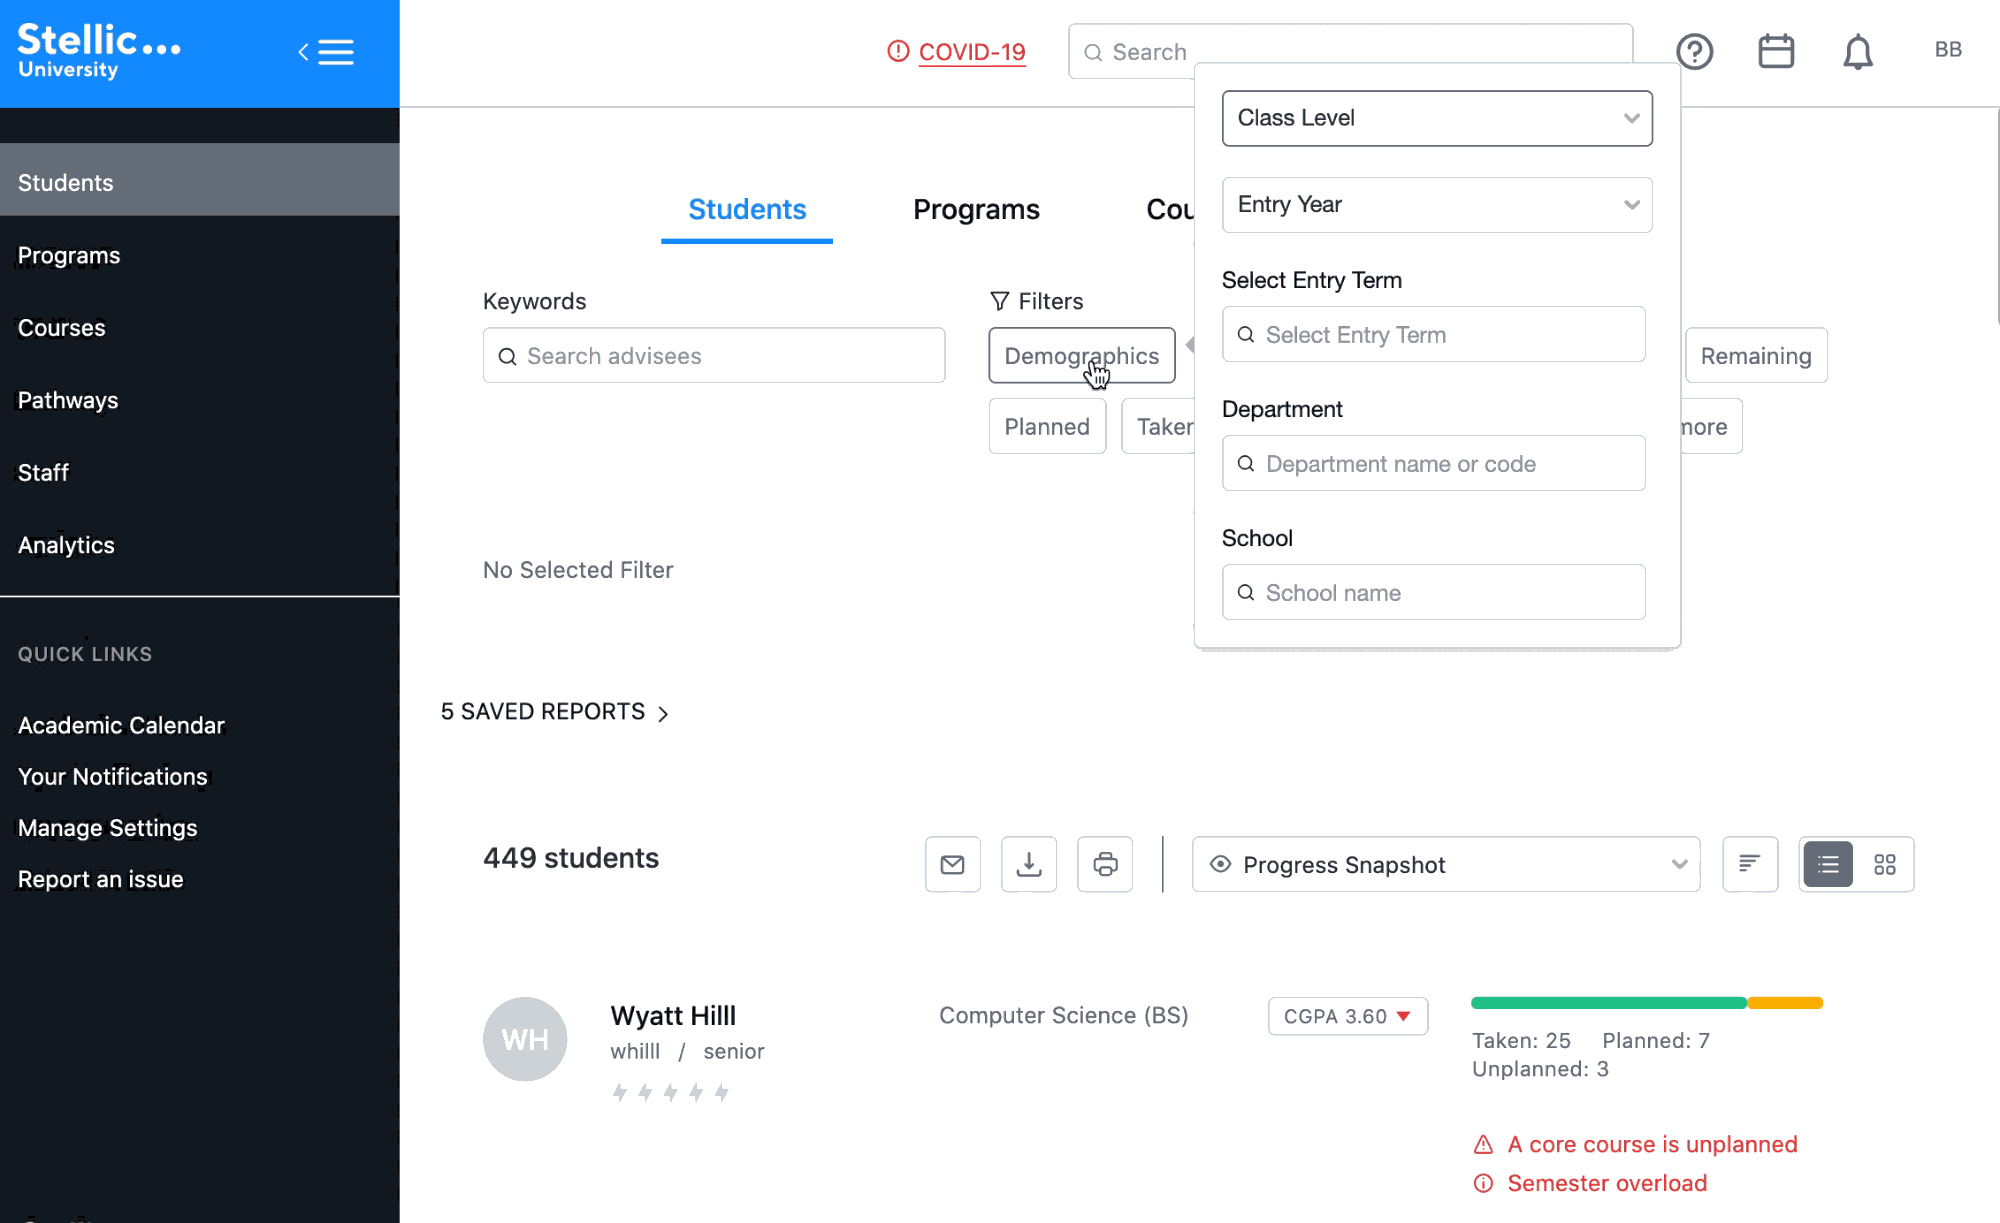
By default, the Students tab displays all students that you have the permission to view at the bottom of the screen, under the search filters. As you select filters, the number of students displayed will change to reflect your search results.
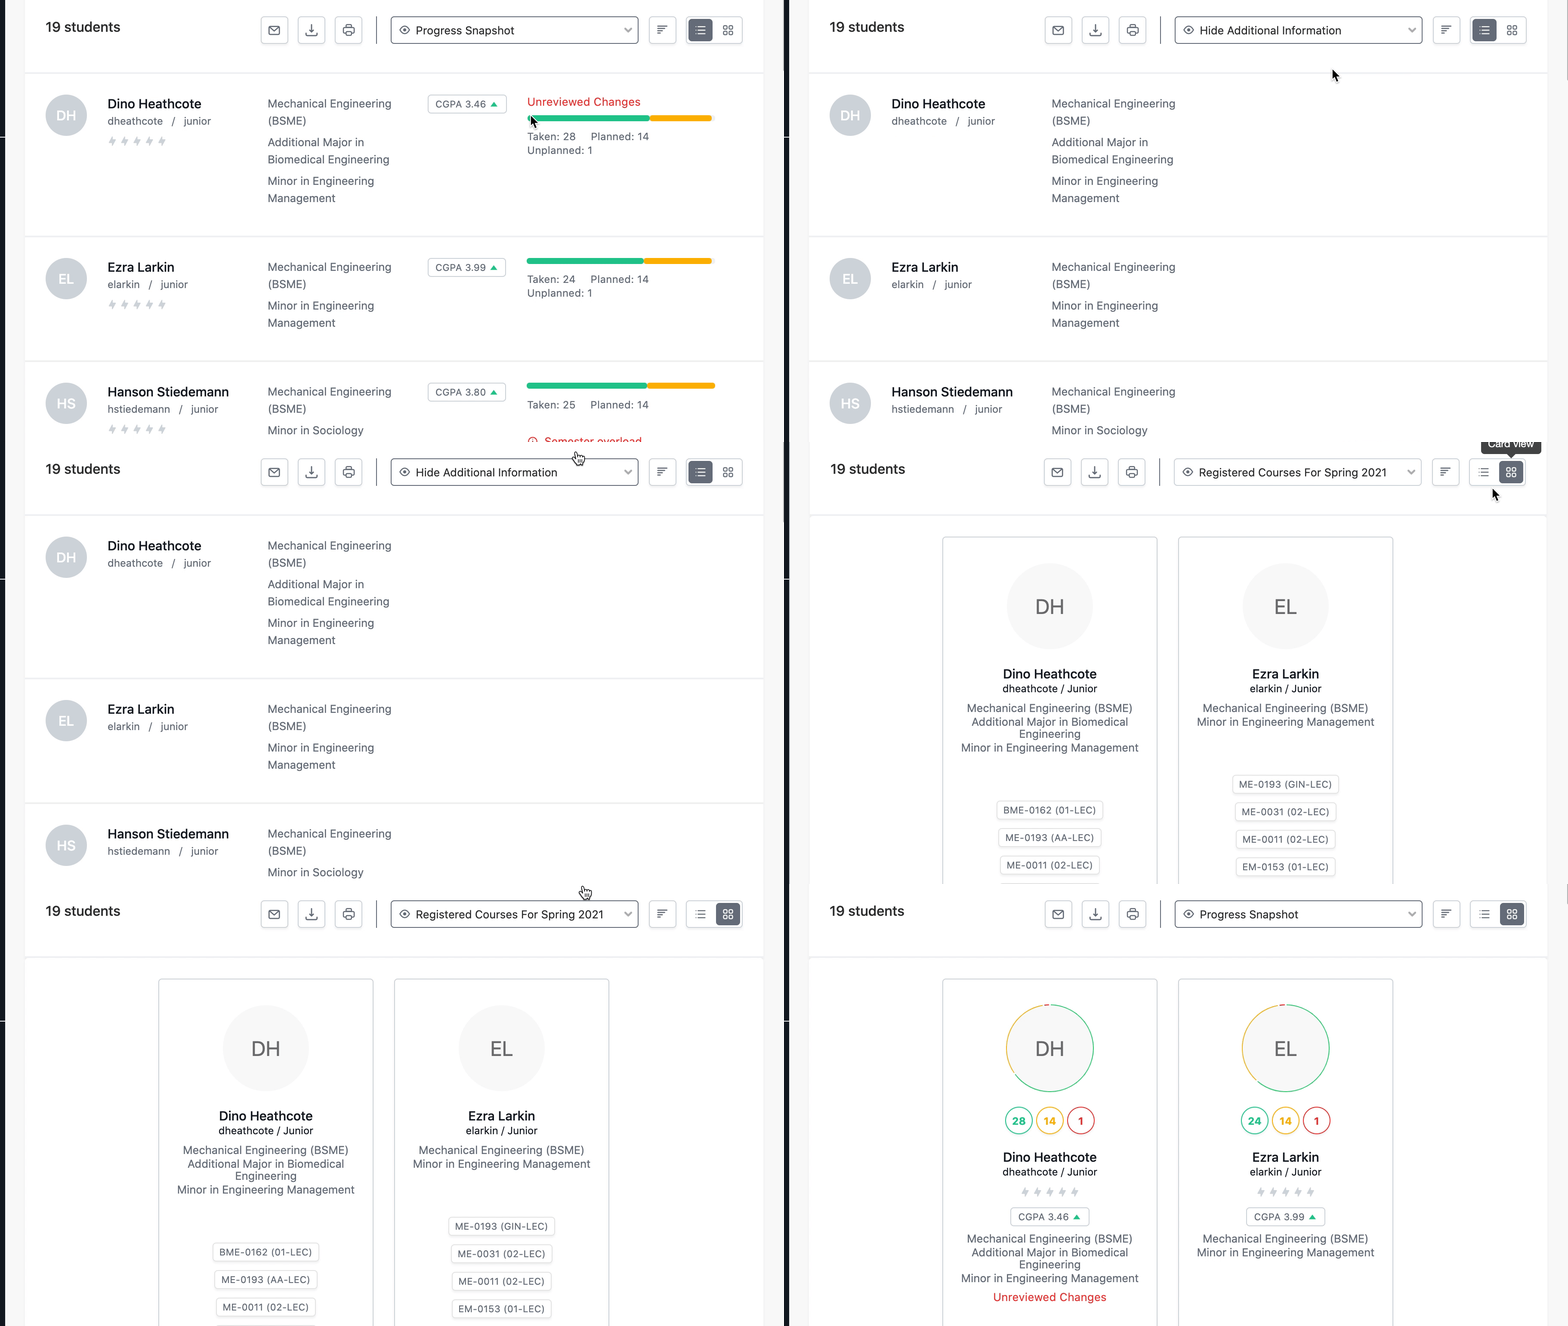
The search will automatically default to a list view, with the students’ GPA and progress bar showing. You can change these views by clicking on the dropdown menu to select different options for display, or toggling between list and card view.
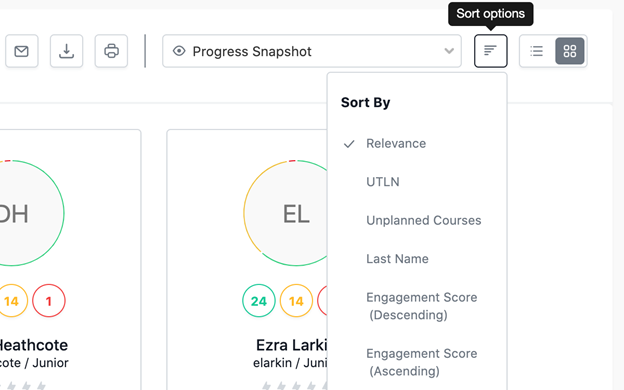
You can also choose several different sort options.
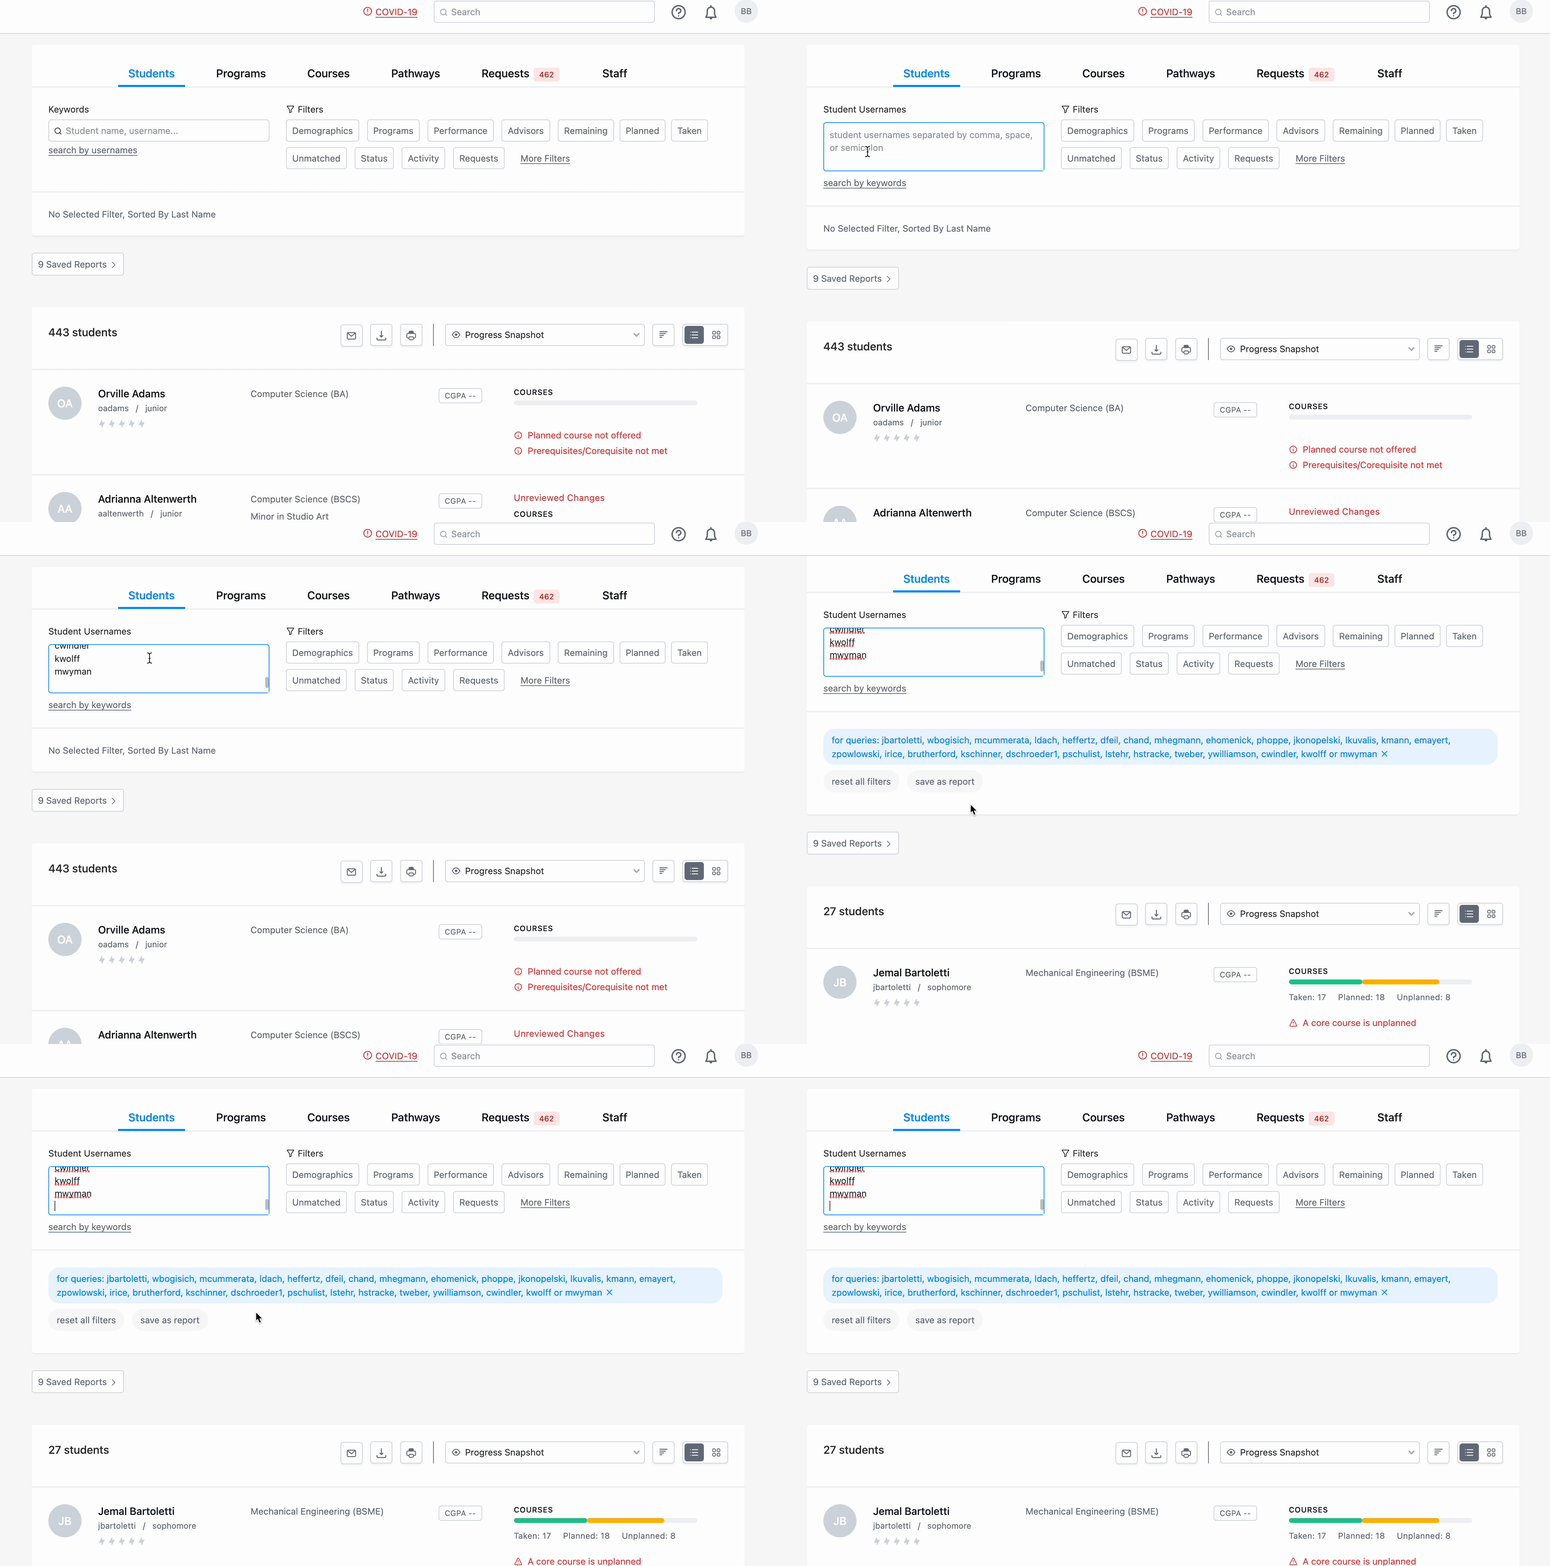
You can search for multiple students by clicking on the link for "search by usernames" below the student search box.

The dialogue box will expand to accommodate multiple usernames. When searching for students, you must use the students' IDs/usernames - Stellic will not be able to search by individual student names when searching for multiple students. You can type or paste a list of student usernames into the box. Usernames must be separated by a comma, space, or semicolon. In this example, we paste a list of students' usernames from a spreadsheet.
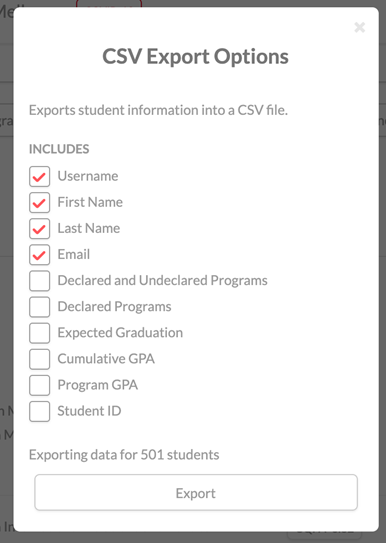
Clicking the Export icon will export a list of all student names and emails into a CSV document.

You can perform a student search to filter to a specific student set, then export the names and emails of that student set to CSV. This can be really helpful for generating a list of students, ex. Freshman in Business Administration with GPA.
You can also print an audit report of your search by clicking the printer button.

This will generate a printable audit report for each student in your search. You can choose from the ‘Official’ Audit (which only shows classes already taken or registered) or the ‘Planned’ Audit (which shows classes planned out within Stellic, and courses already taken or registered). You can also choose whether or not to include grades
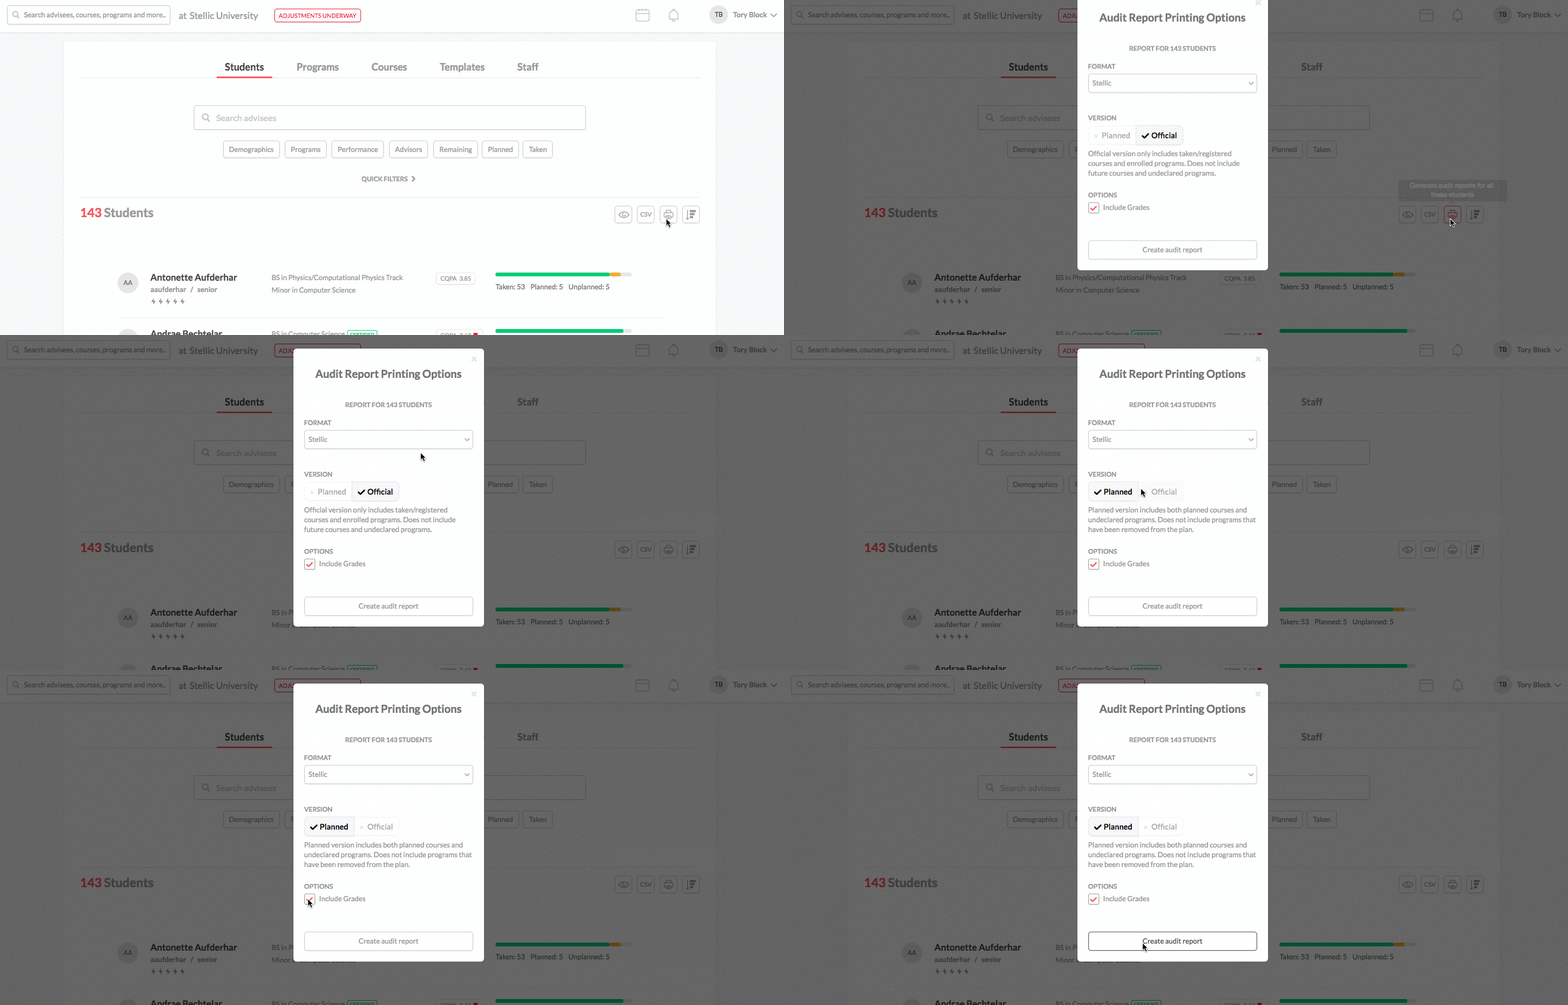
You have two audit layouts to choose from, 'Standard' and 'Compact'. The standard report shows the information in a similar layout to the on-screen audit. The compact report will give you an easy to scan table version of the audit.
If you print a single student's audit, you'll also have the option to print 'Only Primary Major'. This option will recalculate the classes in the audit for the student's primary program only, meaning that it will remove any other programs so it will look different than the on-screen audit version.
You can save any set of search criteria as a saved report. Once you have entered your desired search filters (student demographics, program, GPA, courses planned, etc.), click on the "save this search" button underneath the number of students header for your query results. You can then name your saved search to access quickly from within your saved reports section of your login page
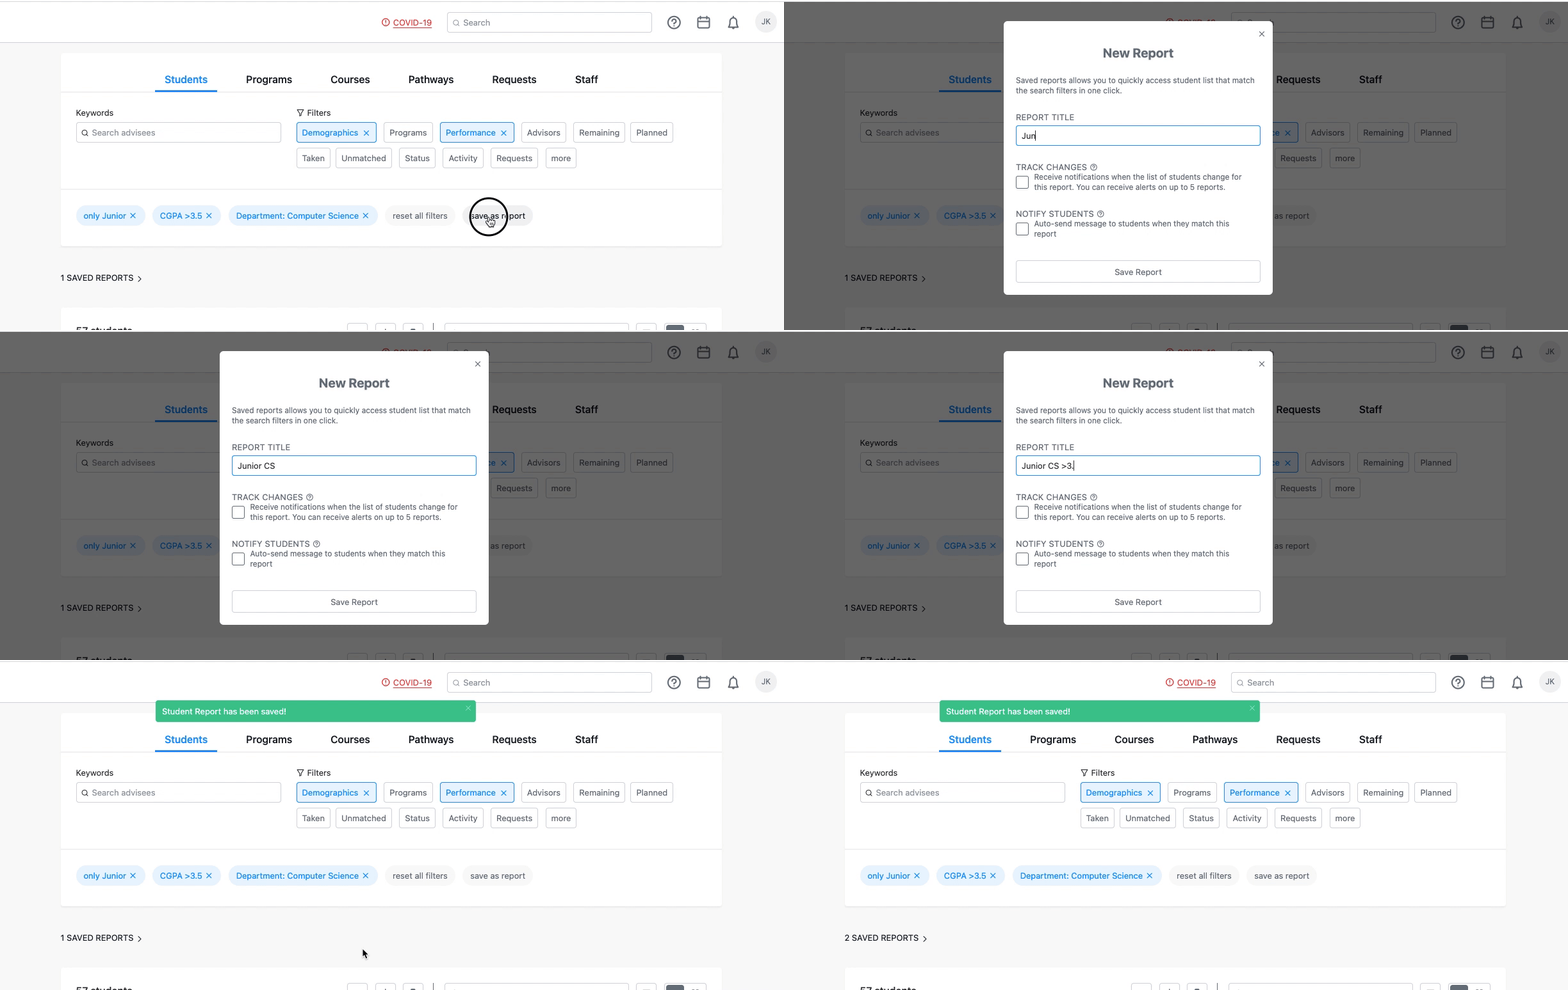
After saving a search, you’ll see it in the main Student tab under ‘Saved Reports’.
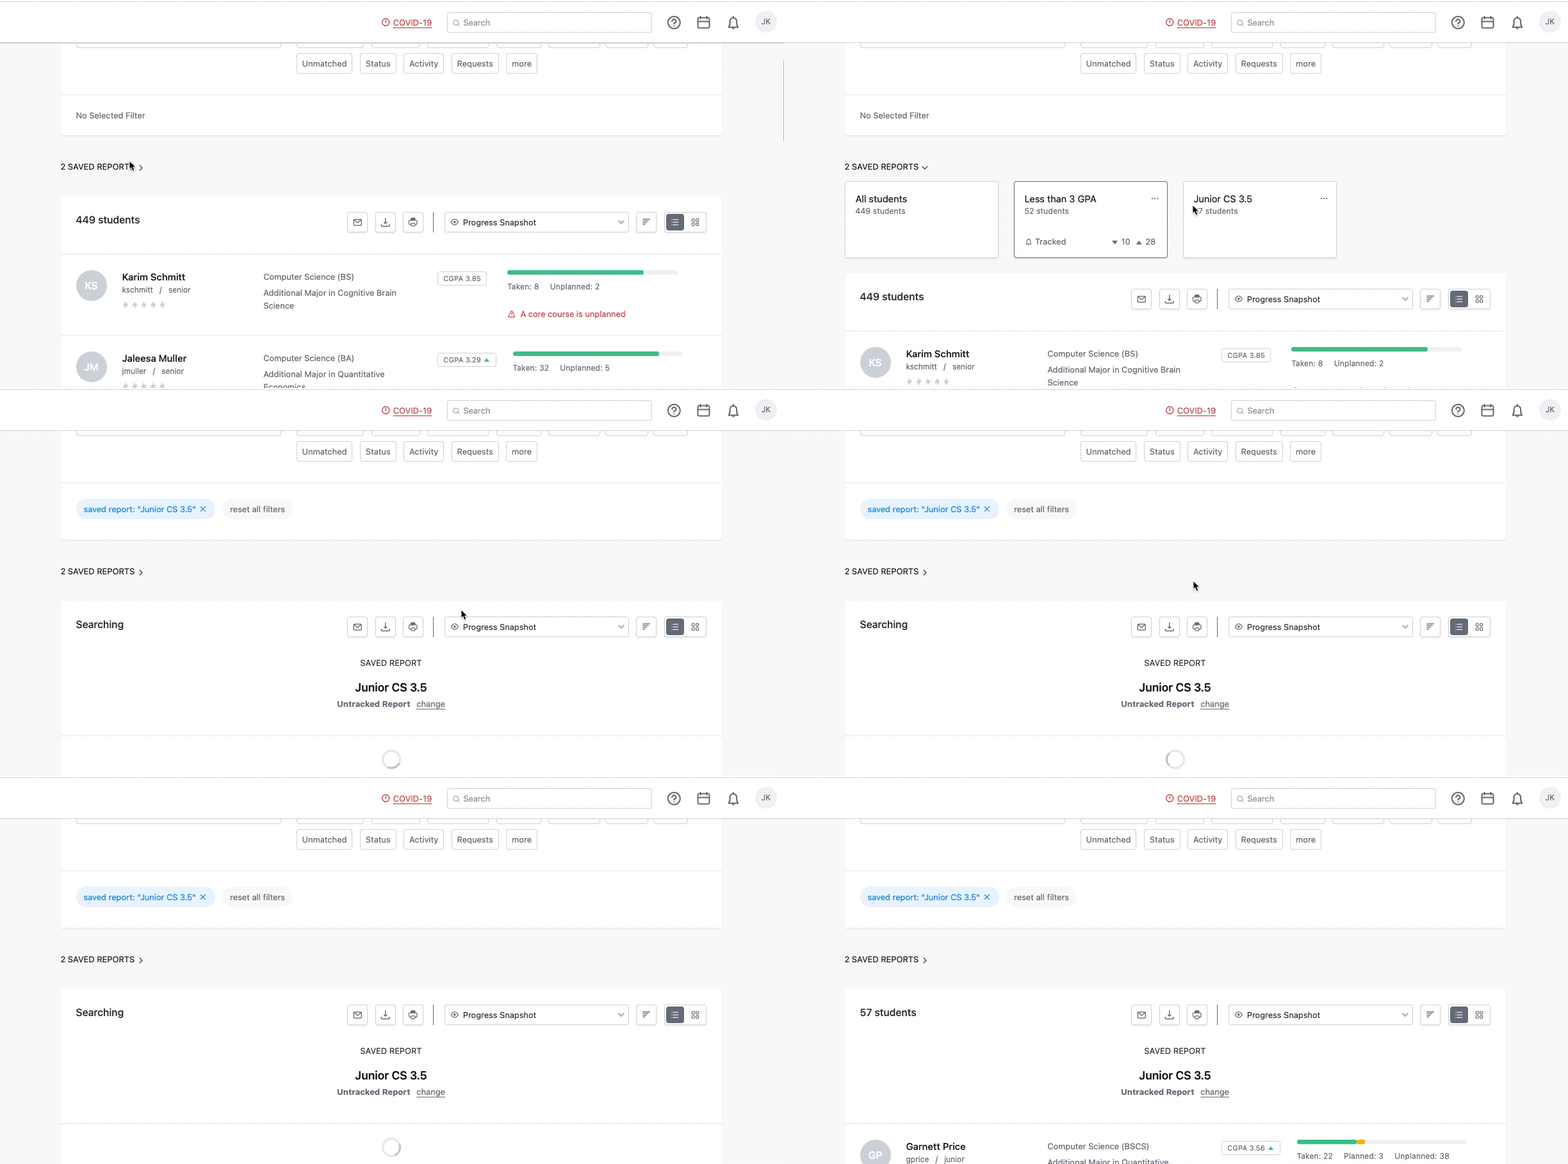
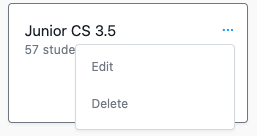
You can always rename the saved search by clicking the three dots in the top right corner of the filter box. You can also delete a saved search from that menu
If there is a report where you would like to receive more dynamic information than what is offered in a traditional saved report, you can track up to five reports which will enable alerts when the results of that report change, as well as display more information about any student changes within the report results.
To create a report with tracked changes, follow the same steps as above - filter your students by the desired fields, and then save the report. You can then select the option to track changes to the report.
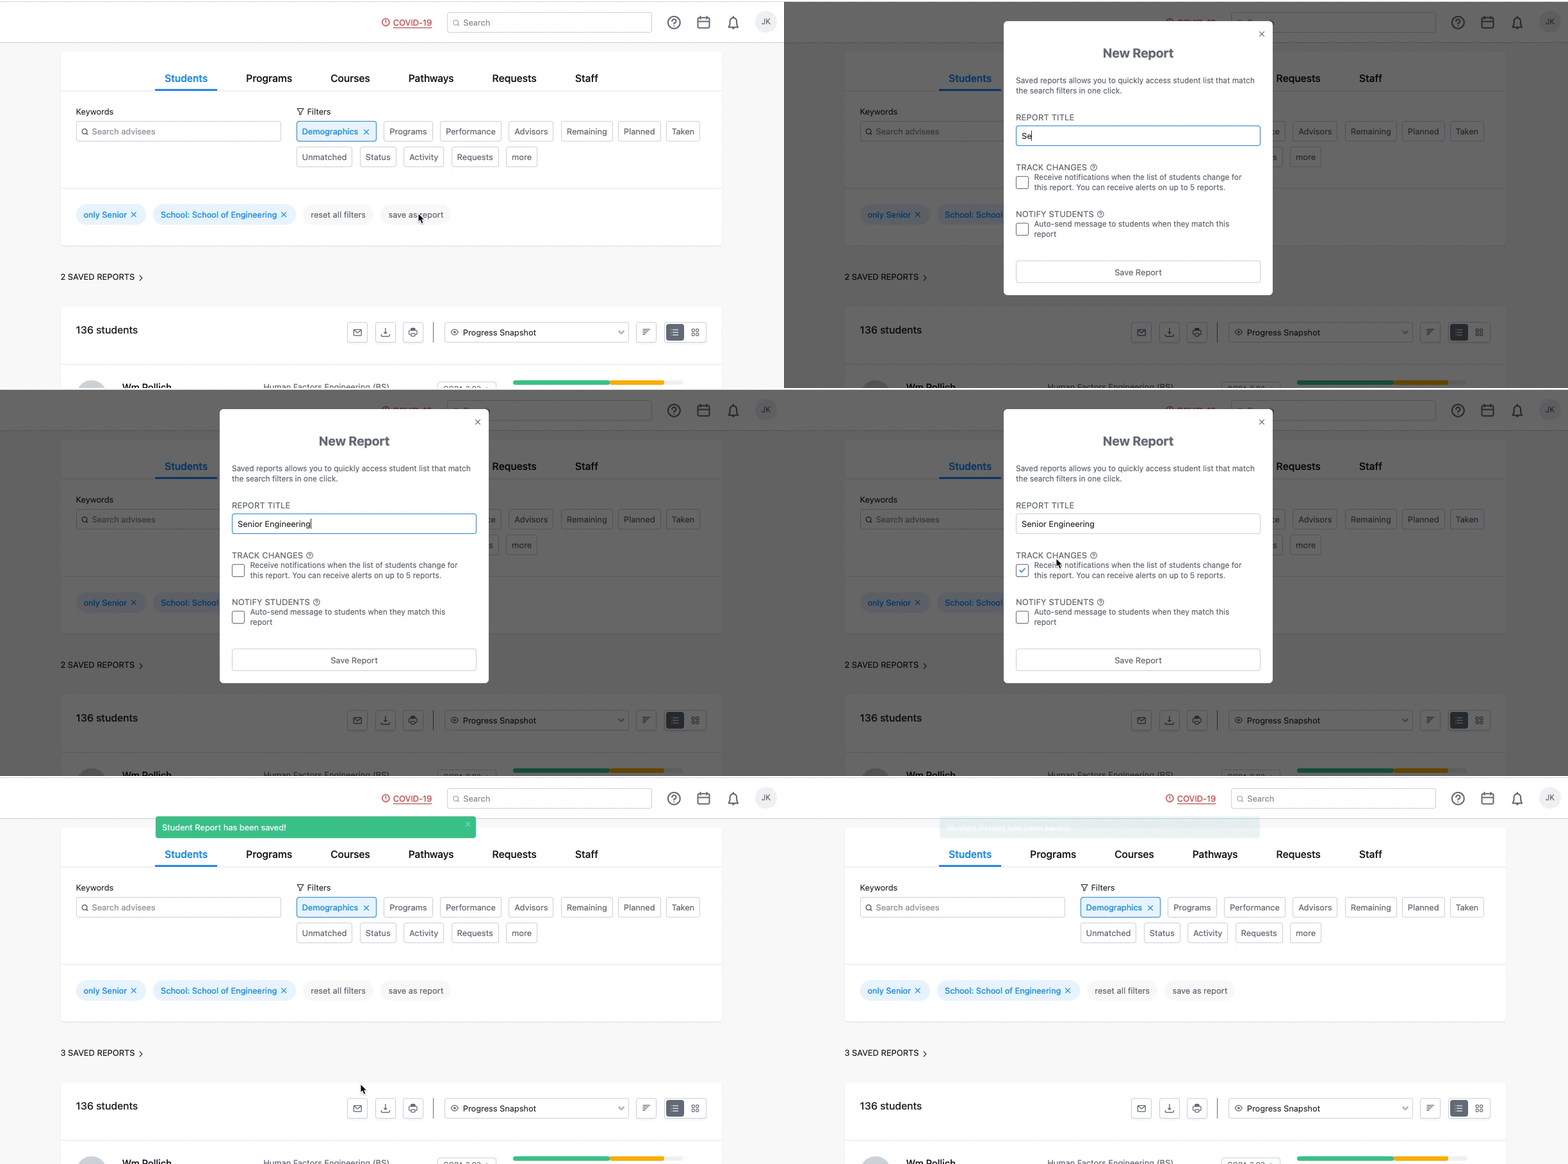
When the results of the search change, you will be alerted through notifications. How you receive the notification (whether it is in-app or also through email) depends on the settings you have enabled.

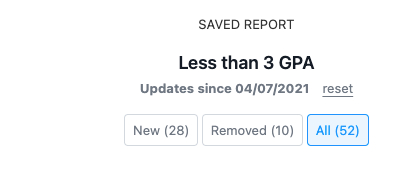
By clicking on a tracked report, you can view the specific students that have changed since the last time you logged into the platform. You can view students that have been newly added to the search results, newly removed from search results, or simply view all students that meet the search criteria (the "all" filter does not include students that have been removed).
From the student search dashboard, you will be able to download a CSV report of the remaining requirements for the list of students. This report will map each student to the list of requirements remaining for them. You can run this report on either the students' official or planned audits - the report will only pick up any requirements that are still showing as remaining in whichever audit version you pick. (In other words, if your official audit displays courses that are registered for students, those requirements will not appear in the remaining requirements report.)
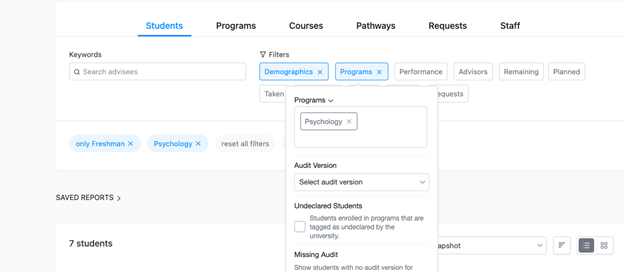
1. Use the search filters to identify the student population of interest.
2. After you have the list of students, click on the print icon located on the right just below the search filters.
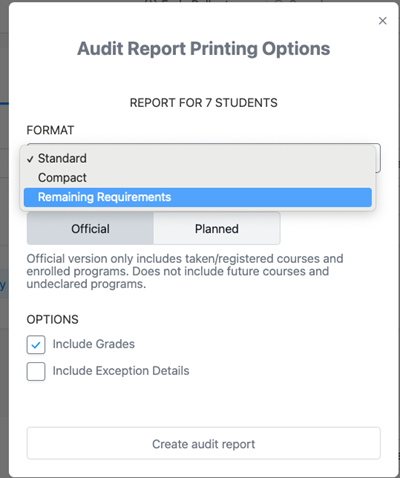

3. Pick the option "Remaining Requirements" from the Format options and click "Create audit report".
4. This will download a CSV report of the remaining requirements.

The columns generated within the remaining requirements report are currently not customizable.
Current columns include the student's user ID, name, expected graduation term, program name, and assigned advisors. We have also included columns for audit last computed, which tells you the last time the requirements were refreshed within a student's audit, and up-to-date audit, which tells you if the information you are seeing is the most up to date program information.
This functionality allows all users with the permission to view a student's audit to request an exception. The request goes to any users that have the permission to make an exception on that student.
To request an exception, first navigate to the respective student profile in Stellic. You'll see all the degree requirements for the student. Degree categories with a red number (instead of a yellow or green check mark) are not satisfied.
If the category should be satisfied by a course the student already taken or needs to be waived, click the three dots next to the Category name and select ‘request an exception’.
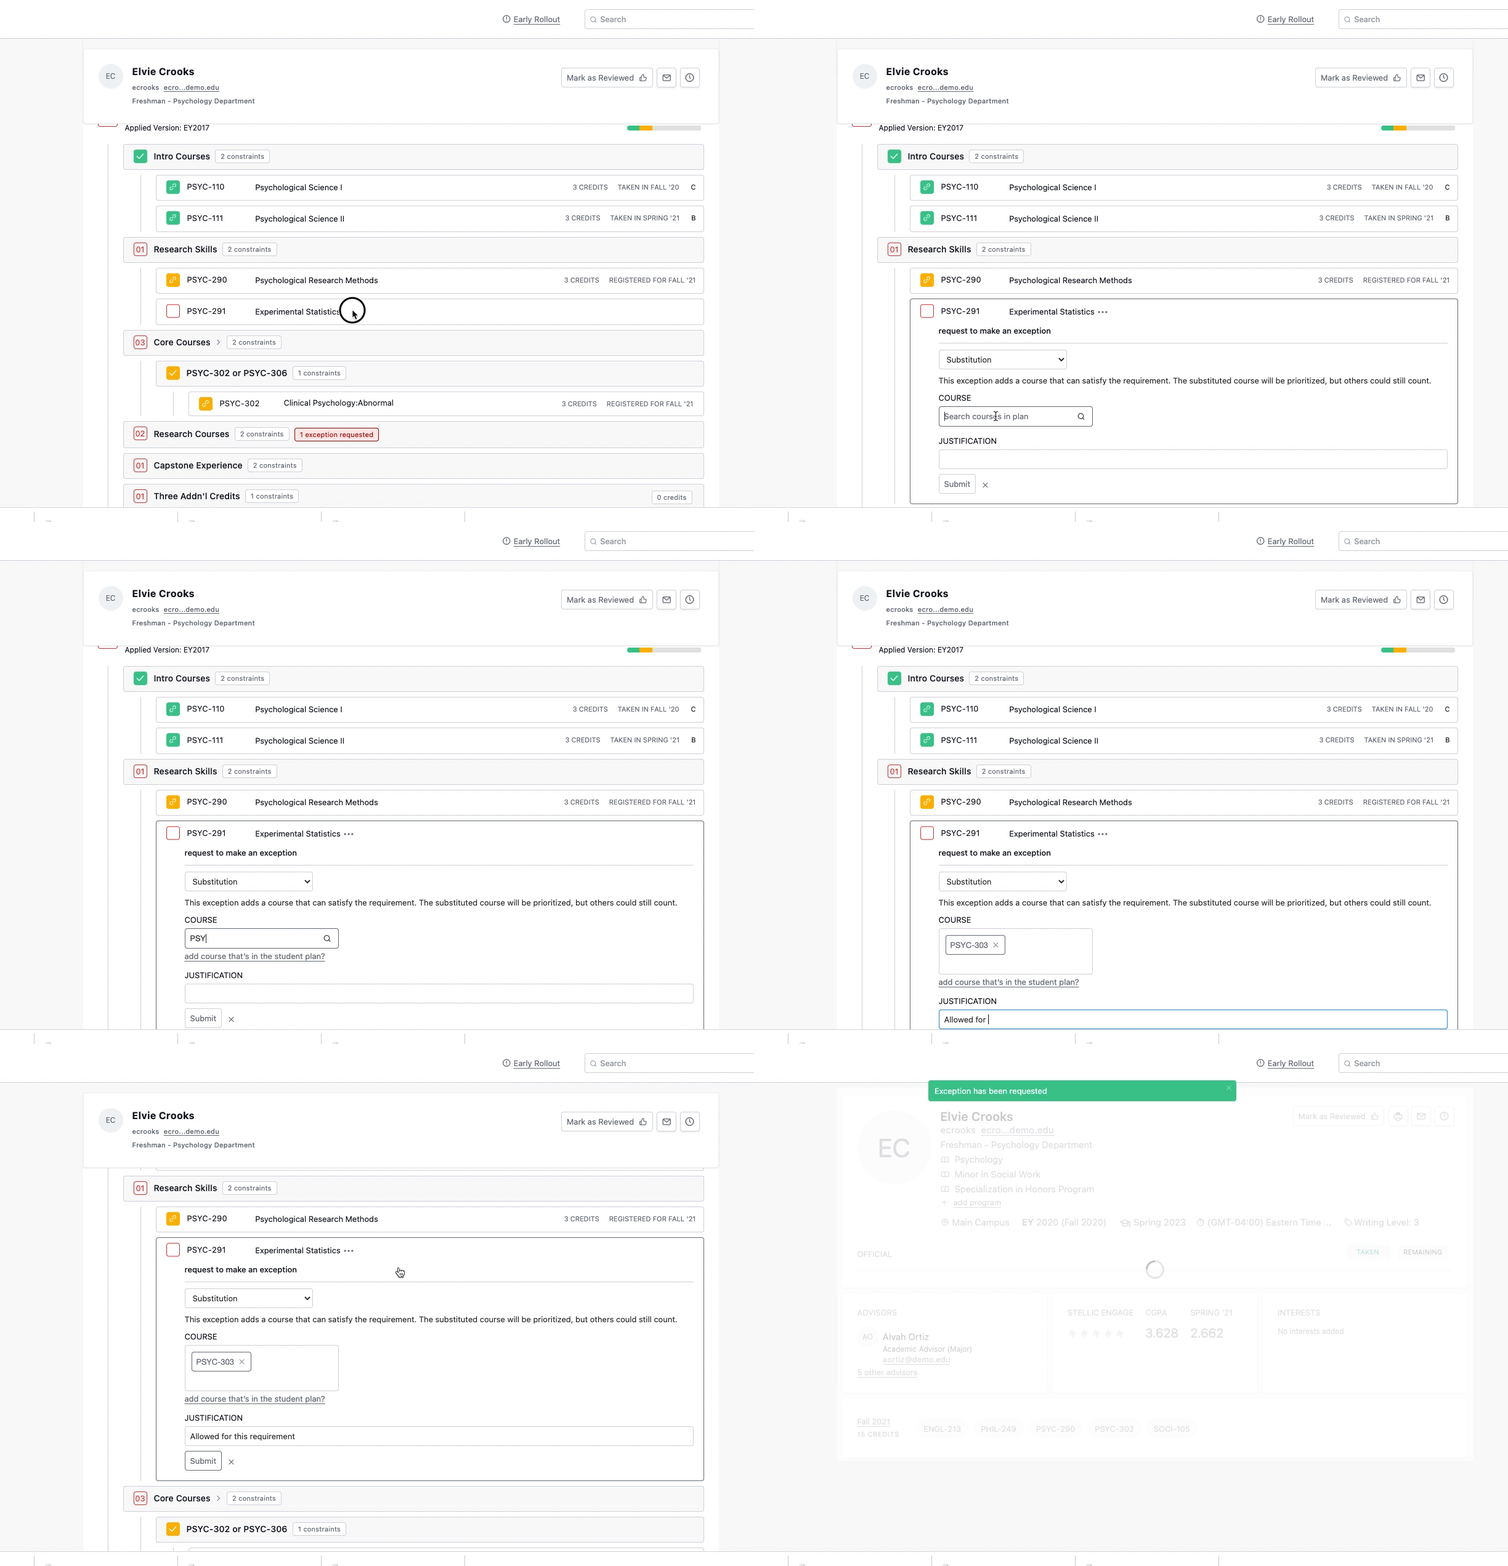
Within the exception menu, you can choose from several options:
Waive this Requirement will change the audit so that the student does not have to satisfy the requirement at all. If there are sub-categories in that category, they will also be waived.
Tip: If you waive the requirement, no specific course will show in the audit under this requirement. If the audit also has a unit total constraint, you may want to modify that constraint, since no units are counted under a waived requirement.
If you waive a course at the course level, it will waive the course and/or requirement that could use the course in any instance in the student's audit. We strongly recommend avoiding waiving individual courses unless you are certain there are no other instances where the course can be used anywhere else in the student's audit.
Substitution allows for a different course to satisfy the requirement. This option will basically add a course that could count for the requirement to the list of eligible courses (for this student only). Please note that you’ll only be able to select courses that are already showing in the plan. Course with failed or incomplete grades will not be able to satisfy requirements.
Waive or Modify Requirement Constraint allows you to change the constraints for the category. (Not available at the course level.) You can change a primary constraint, or change or remove a secondary constraint.For ‘justification’ please give us some details on why the course should be counting there -- then click ‘submit’! Your exception request will be reviewed by all administrators who have permission to make exception on the student.
Exclude Courses allows you to select courses that can not count for the requirement. This means that even if the courses would typically count toward the requirement's constraints, the course will no longer be allowed to fulfill the requirement.