Renegade Respirator

LULZBOT TAZ 6 / MINI 2 KEY SETTINGS
Layer Height: 0.18 mm
Initial Layer Height: 0.25 mm
Line Width: 0.5 mm
Wall Thickness: 1.04 mm
Wall Line Count: 2
Infill Density: 25%
Top/Bottom Thickness: 1 mm
Extruder Temperature: 215 C
Print Speed: 80 mm/s
Infill Speed: 80 mm/s
Wall Speed: 40 mm/s
Travel Speed: 175 mm/s
Lulzbot TAZ 6 Tool Head: Single Extruder Tool Head v2.1 (.50mm Nozzle)
Lulzbot Mini 2 Tool Head: E3D Titan Aero SE (.50mm Nozzle)
Printer / Filament Brand Used: TAZ 6 / Gizmo Dorks PLA
Printer / Filament Brand Used For Interface Gasket: Mini 2 / Ninjatek NinjaFlex TPU
MAKERBOT KEY SETTINGS
Layer Height: 0.2 mm
Line Width: 0.5 mm
Wall Width: 0.5 mm
Wall Line Count: 4
Infill Density: 100%
Top/Bottom Thickness: 0.8 mm
Extruder Temperature: 215-230C
Print Speed: 120 mm/s
Infill Speed: 90 mm/s
Travel Speed: 150 mm/s
Filament Brand Used During Prototyping: Makerbot Filament PLA
Filament Brand Used For Interface Gasket: n/a


Heat Molding & Fit Customization
STEP 1:
Clean the mask after printing, remove burrs and strings. Use a 150-grit sandpaper to sand the inside surface that you expect to contact your face. The smoother the better. Use a cloth wetted with acetone to further smooth the sanded surface if desired.
STEP 2:
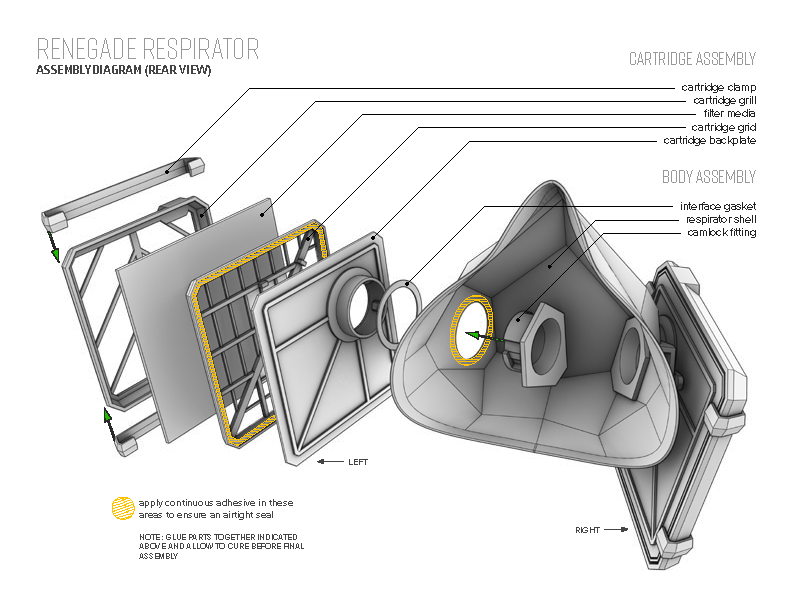
Install the camlock valves with silicone or similar sealant/adhesive
o Apply the valves before heat molding to better retain mask shape
o Allow to fully cure before heat molding
STEP 3:
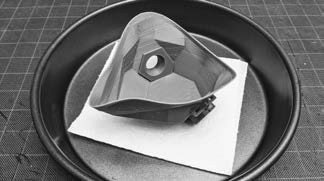
Place the mask shell in an oven preheated to 80°C (176°F) for 3 minutes. Place the mask open side up, on a folded paper towel placed in a baking dish to prevent the metal grill from melting the shell. Set up a mirror or camera phone on selfie mode nearby the oven to use during Step 04.

STEP 4:
Remove the mask shell from oven and gently press the mask to your face with a slight pivoting motion. Lightly anchor below your chin then pivot to contact the rest of your face. Use your fingers to gently press the mask against your nose bridge and cheek bones. Use the mirror or phone on selfie mode to guide your actions.
Shape your hand position as if yelling across a field; use your index fingers and thumbs to gently contour the soft plastic to your face. The mask hardens within seconds even though it still feels warm.
Inspect the fit in the mirror and note how well it seats on your nose bridge and upper cheeks. These are the most likely areas to leak.
STEP 5:
Repeat the heat molding process, this time press a little bit harder on the sides of your nose and upper cheeks. Do not over do it! Do not press your fingers towards each other, that will make a crease on the top of your nose bridge and cause a leak. Try to apply even pressure with your whole finger, not just the fingertips
STEP 6:
A gasket may be added around the edge of the mask to improve comfort and fit.
Download:
The design files for this product will be made available at a later date. For now, you can download a design PDF with the information and instructions outlineded here.
Design Specifications Design Files
By downloading these files you agree to the terms of the University’s COVID Use License
Disclaimer:
The Board of Regents of the University of Oklahoma (“University”) makes no representation or warranty of any kind with respect to the design for a “Face Shield” (“Design”), whether express or implied, including any representation or warranty relating to the compliance of any part based on such Design with any specific regulation, any warranty of merchantability, fitness for a particular purpose, or non-infringement of any patent or other proprietary right.
The Design should not be considered Personal Protective Equipment or “PPE” because its capability to provide protection is unknown. Caution should be exercised when considering the use of the Design. The Design is not intended to be a suitable replacement for N-95 or other surgical masks for healthcare workers, nor does it eliminate the risk of contracting or exposure of others to any disease or infection. The Design and manufacturing of this “Face Shield” is not regulated by the U.S. Food & Drug Administration or the U.S. Centers for Disease Control and Prevention (CDC), nor has it been evaluated or approved by The National Institute for Occupational Safety and Health (NIOSH) or any other regulatory authority.
The individual, group, organization, or any other entity downloading the Design (“User”) acknowledges that User downloads and uses the Design at User’s own free will and own initiative and is aware that there are certain risks associated with using the parts based on such Design, including but not limited to, injury to the body, general health, and well-being, death, and/or property damage. User hereby voluntarily assumes all risks associated with downloading and using the Design, including the suitability and compliance with any applicable regulations.
The University shall not be liable for any claims, demands, damages or injuries, including but not limited to, property damage, bodily injury, death, indirect, special or consequential damages, arising out of or in connection with User’s downloading, manufacture, commercialization, and any other use of the Design.

