Skip Navigation

Text

Text Component

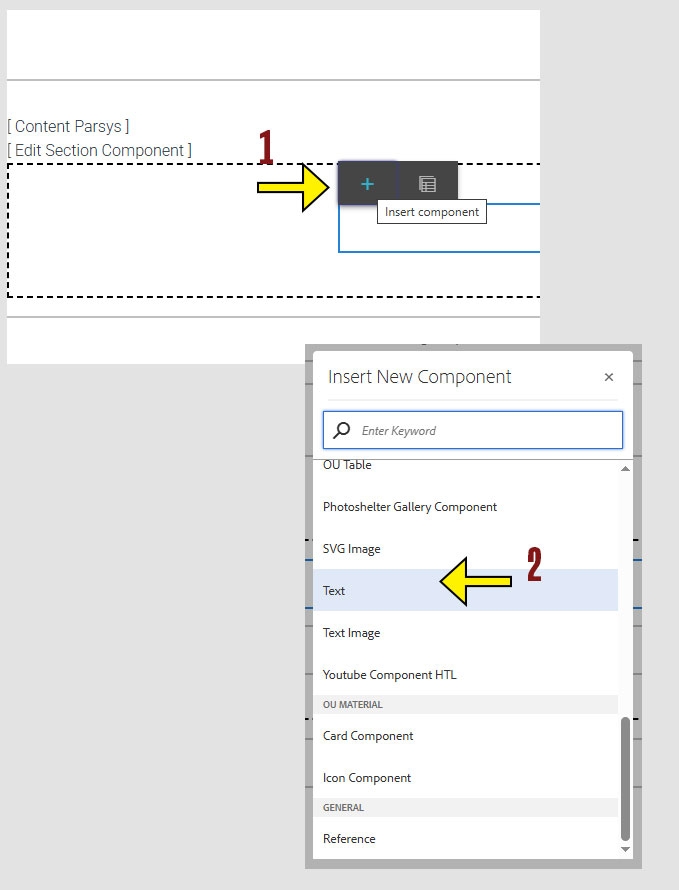
When working within the Content Parsys all web components must first be placed inside of a Section Component

The Rich Text Editor is where you add and format text on your website. It works like a simple word processor and helps keep your content clear and easy to read.

Usage

  • Add plain text
  • Bold or italicize words
  • Create bulleted or numbered lists
  • Add hyperlinks to other pages or websites

How to Add a Text Component

Click within a section component to insert new components.

  1. Click the + icon.

  2. Choose the Text Component
arrow pointing to the + icon on the component menu and second arrow pointing to the Text Control option on the insert new component menu.

How to Configure the Text Component

  1. To start using the component, click anywhere on the component and a menu will appear.

  2. Click the wrench icon to enter configure mode.
screenshot of the configure toolbar with an arrow pointing to the wrench icon.

Inside the Text component, you’ll find three fields:

  1. Text Box
    Where you enter and format your content.

  2. ID
    Used to create anchor links to this section of the page.

  3. CSS Class
    Used to apply custom styling with predefined CSS classes.
Configuration fields of the Text component: Text box, ID, CSS Class. Arrows highlight each field.

Working within the Component

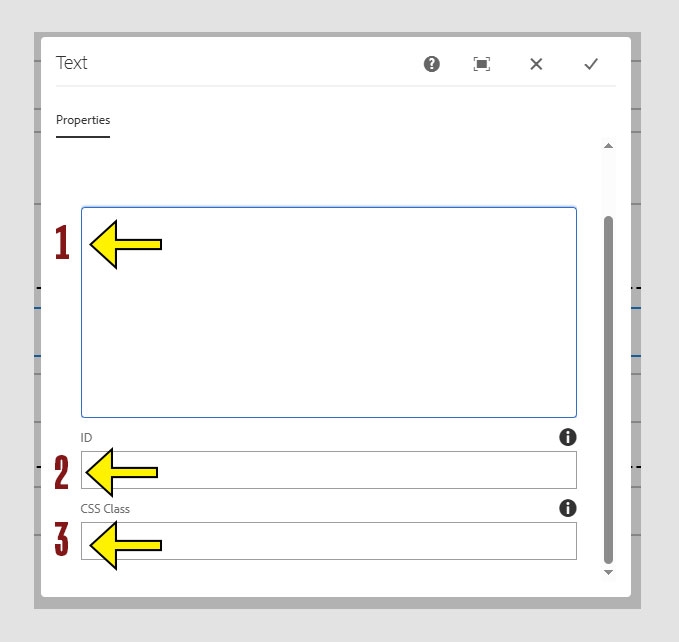
The text box is where most of your content editing will happen. You can type and format text here, similar to how you would in a Word document.

  1. Click inside the text box to begin editing.

  2. The formatting toolbar will appear once your cursor is in the textbox.

  3. When you're finished editing, click the check mark to save your changes and close the component. To cancel without saving, click the X.
Configuration fields of the Text component. Arrows highlight the text field area and the associated tool bar. The check mark is highlighted to sow how to save changes.

Text Formatting Toolbar

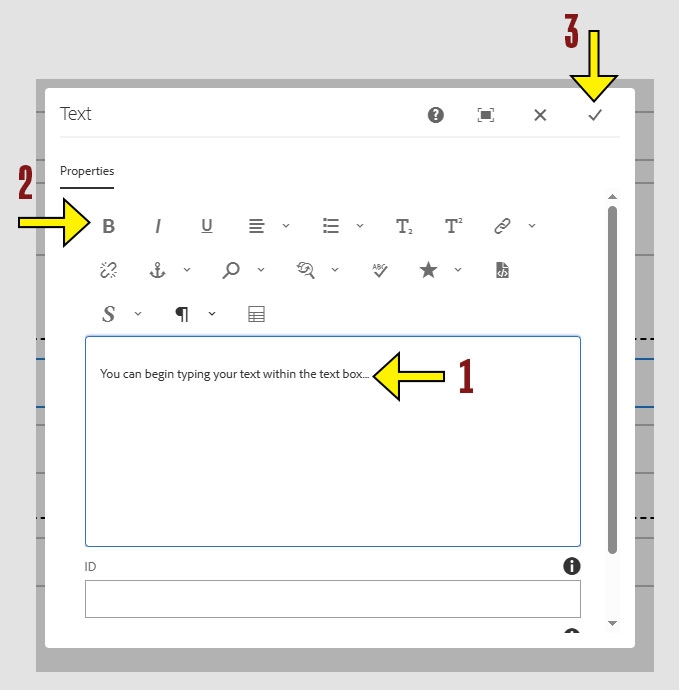
The toolbar provides formatting tools similar to what you’d find in a word processor. Here's what each button does:

Tip: Hover over each icon in the toolbar to see its name and function. This is a quick way to learn what each tool does

Text Formatting

  • B – Bold text
  • I – Italicize text
  • U – Underline text
  • Styles – Apply special text styles. Button is the only enabled option.
  • Paragraph Formats – Choose between paragraph text and headings (Header 2, 3, or 4)

Text Alignment

  • Left Align – Align text to the left
  • Center Align – Center your text
  • Right Align – Align text to the right
  • Justify – Distribute text evenly across the width of the text box

Lists and Indentation

  • Bullet List – Use this for bulleted lists. If pasting from elsewhere, remove original bullets and reapply here for correct mobile formatting
  • Numbered List – Same as above, but for numbered items
  • Outdent / Indent – Move text left or right. Works well for nested list items

Links

  • Hyperlink – Link selected text to another page or site
  • Unlink – Remove a hyperlink
  • Anchor – Link to a specific section within the same page

Additional Tools

  • Subscript – Add characters below the line (e.g., H₂O)
  • Superscript – Add characters above the line (e.g., 1st)
  • Find / Replace – Search and replace text within the component
  • Special Characters – Insert symbols like ©, ™, or £
  • Source Edit – Edit raw HTML if you're familiar with simple code
  • Spell Check - 

Tables

  • Insert TableDo not use, instead use the OU Table Component for consistency with Accessibility and design standards